AutoGen - Enable Next-Gen LLM Apps
a framework that enables development of LLM applications using multiple agents that can converse with each other to solve task


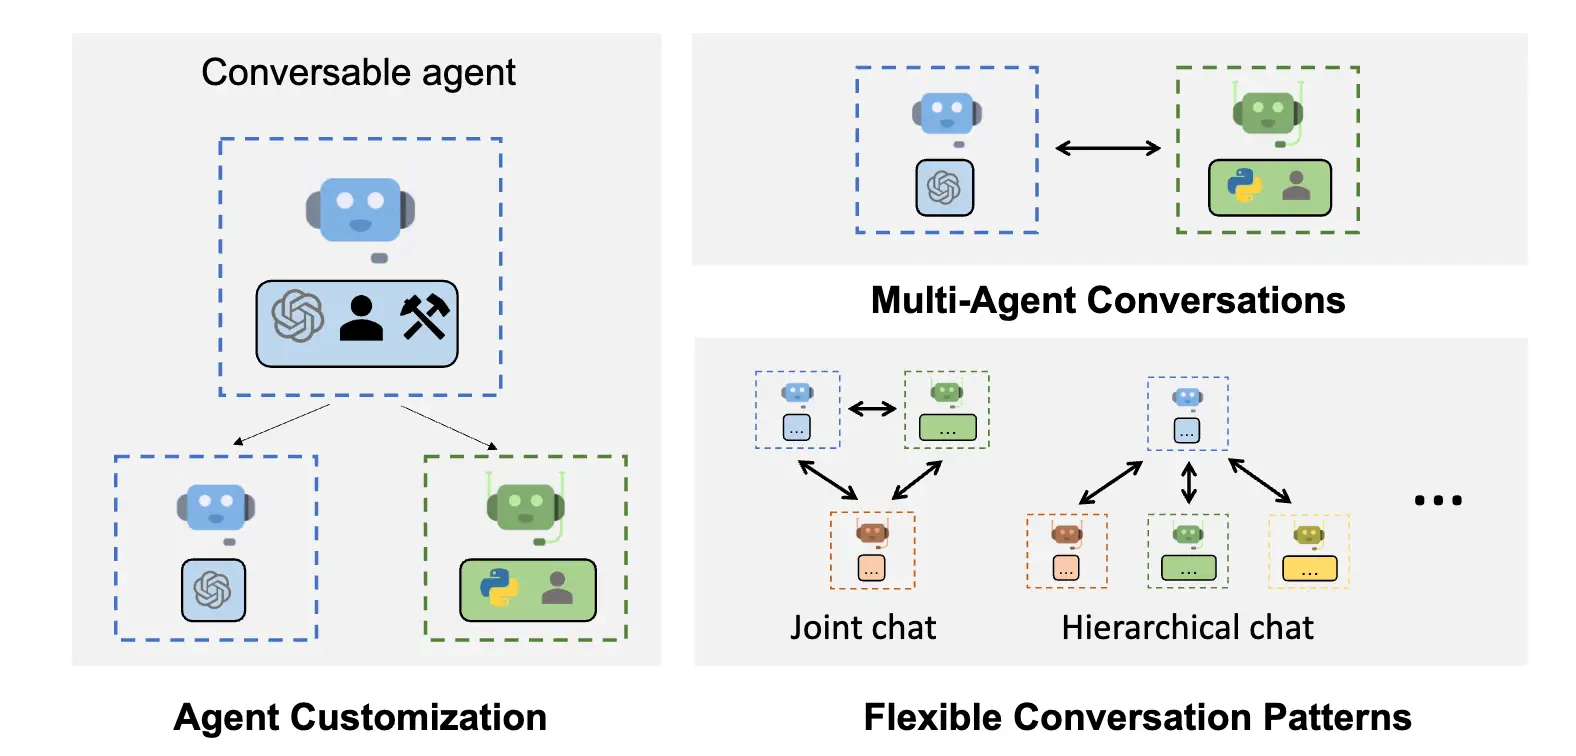
What’s AutoGen?
- Multi-Agent Conversation Framework
AutoGen provides multi-agent conversation framework as a high-level abstraction. With this framework, one can conveniently build LLM workflows. - Easily Build Diverse Applications
AutoGen offers a collection of working systems spanning a wide range of applications from various domains and complexities. - Enhanced LLM Inference & Optimization
AutoGen supports enhanced LLM inference APIs, which can be used to improve inference performance and reduce cost.
AutoGen Github
In this article, I will demo you a simple example using Google Colab
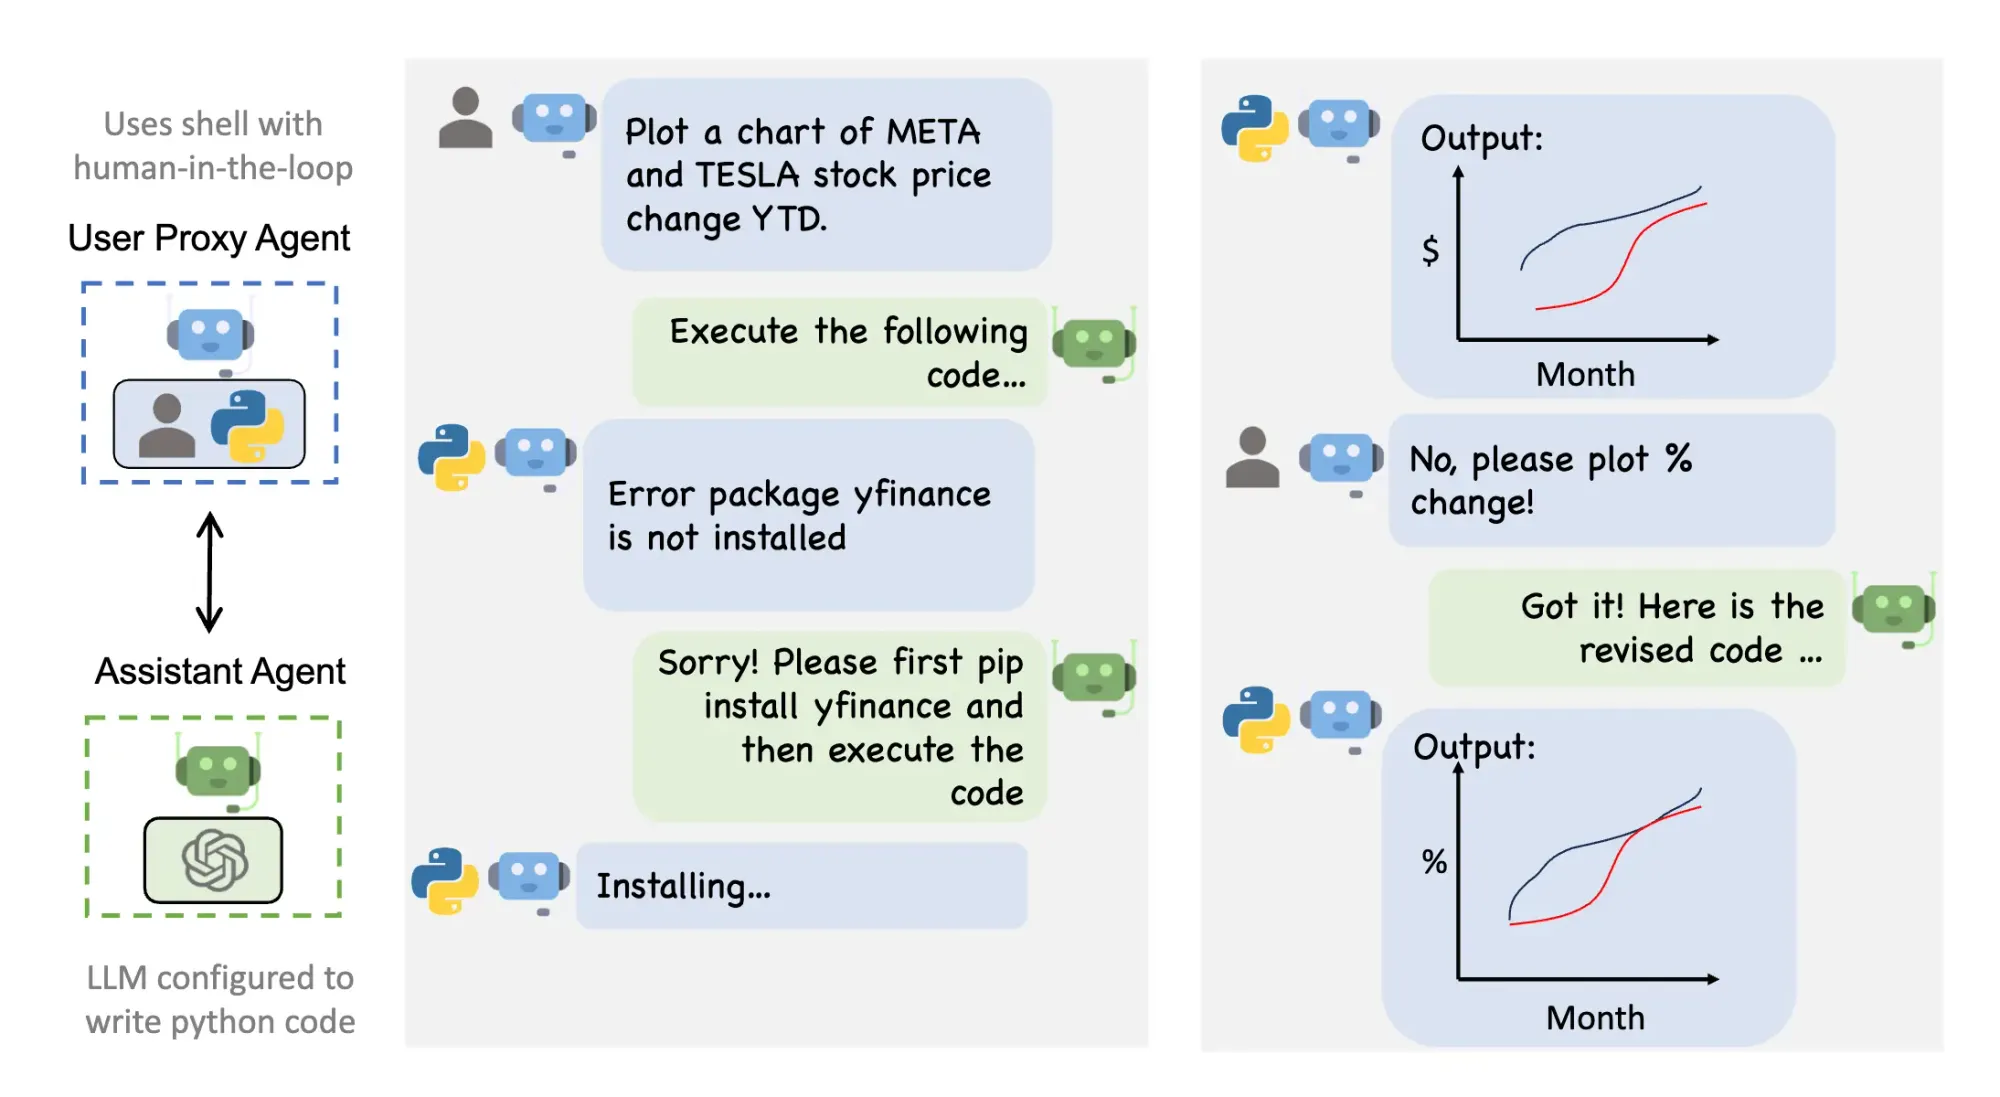
Auto Generated Agent Chat: Task Solving with Code Generation, Execution & Debugging
AutoGen offers conversable LLM agents, which can be used to solve various tasks with human or automatic feedback, including tasks that require using tools via code.
Please find documentation about this feature here.
In this notebook, we demonstrate how to use AssistantAgent and UserProxyAgent to write code and execute the code. Here AssistantAgent is an LLM-based agent that can write Python code (in a Python coding block) for a user to execute for a given task. UserProxyAgent is an agent which serves as a proxy for the human user to execute the code written by AssistantAgent, or automatically execute the code. Depending on the setting of human_input_mode and max_consecutive_auto_reply, the UserProxyAgent either solicits feedback from the human user or returns auto-feedback based on the result of code execution (success or failure and corresponding outputs) to AssistantAgent. AssistantAgent will debug the code and suggest new code if the result contains error. The two agents keep communicating to each other until the task is done.
Requirements
AutoGen requires Python>=3.8. To run this notebook example, please install:
pip install pyautogen
- Colab code
%pip install pyautogen~=0.1.0
- Colab result
Collecting pyautogen~=0.1.0
  Downloading pyautogen-0.1.6-py3-none-any.whl (69 kB)
     ━━━━━━━━━━━━━━━━━━━━━━━━━━━━━━━━━━━━━━━━ 69.3/69.3 kB 1.8 MB/s eta 0:00:00
Collecting diskcache (from pyautogen~=0.1.0)
  Downloading diskcache-5.6.3-py3-none-any.whl (45 kB)
     ━━━━━━━━━━━━━━━━━━━━━━━━━━━━━━━━━━━━━━━━ 45.5/45.5 kB 5.2 MB/s eta 0:00:00
Collecting flaml (from pyautogen~=0.1.0)
  Downloading FLAML-2.1.1-py3-none-any.whl (295 kB)
     ━━━━━━━━━━━━━━━━━━━━━━━━━━━━━━━━━━━━━━━ 295.2/295.2 kB 9.9 MB/s eta 0:00:00
Collecting openai (from pyautogen~=0.1.0)
  Downloading openai-0.28.1-py3-none-any.whl (76 kB)
     ━━━━━━━━━━━━━━━━━━━━━━━━━━━━━━━━━━━━━━━━ 77.0/77.0 kB 9.4 MB/s eta 0:00:00
Requirement already satisfied: termcolor in /usr/local/lib/python3.10/dist-packages (from pyautogen~=0.1.0) (2.3.0)
Requirement already satisfied: NumPy>=1.17.0rc1 in /usr/local/lib/python3.10/dist-packages (from flaml->pyautogen~=0.1.0) (1.23.5)
Requirement already satisfied: requests>=2.20 in /usr/local/lib/python3.10/dist-packages (from openai->pyautogen~=0.1.0) (2.31.0)
Requirement already satisfied: tqdm in /usr/local/lib/python3.10/dist-packages (from openai->pyautogen~=0.1.0) (4.66.1)
Requirement already satisfied: aiohttp in /usr/local/lib/python3.10/dist-packages (from openai->pyautogen~=0.1.0) (3.8.5)
Requirement already satisfied: charset-normalizer<4,>=2 in /usr/local/lib/python3.10/dist-packages (from requests>=2.20->openai->pyautogen~=0.1.0) (3.2.0)
Requirement already satisfied: idna<4,>=2.5 in /usr/local/lib/python3.10/dist-packages (from requests>=2.20->openai->pyautogen~=0.1.0) (3.4)
Requirement already satisfied: urllib3<3,>=1.21.1 in /usr/local/lib/python3.10/dist-packages (from requests>=2.20->openai->pyautogen~=0.1.0) (2.0.5)
Requirement already satisfied: certifi>=2017.4.17 in /usr/local/lib/python3.10/dist-packages (from requests>=2.20->openai->pyautogen~=0.1.0) (2023.7.22)
Requirement already satisfied: attrs>=17.3.0 in /usr/local/lib/python3.10/dist-packages (from aiohttp->openai->pyautogen~=0.1.0) (23.1.0)
Requirement already satisfied: multidict<7.0,>=4.5 in /usr/local/lib/python3.10/dist-packages (from aiohttp->openai->pyautogen~=0.1.0) (6.0.4)
Requirement already satisfied: async-timeout<5.0,>=4.0.0a3 in /usr/local/lib/python3.10/dist-packages (from aiohttp->openai->pyautogen~=0.1.0) (4.0.3)
Requirement already satisfied: yarl<2.0,>=1.0 in /usr/local/lib/python3.10/dist-packages (from aiohttp->openai->pyautogen~=0.1.0) (1.9.2)
Requirement already satisfied: frozenlist>=1.1.1 in /usr/local/lib/python3.10/dist-packages (from aiohttp->openai->pyautogen~=0.1.0) (1.4.0)
Requirement already satisfied: aiosignal>=1.1.2 in /usr/local/lib/python3.10/dist-packages (from aiohttp->openai->pyautogen~=0.1.0) (1.3.1)
Installing collected packages: flaml, diskcache, openai, pyautogen
Successfully installed diskcache-5.6.3 flaml-2.1.1 openai-0.28.1 pyautogen-0.1.6
Set your API Endpoint
The config_list_from_json function loads a list of configurations from an environment variable or a json file.
- Colab Code
import autogen

# config_list = autogen.config_list_from_json(
#     "OAI_CONFIG_LIST",
#     filter_dict={
#         "model": ["gpt-4", "gpt-4-0314", "gpt4", "gpt-4-32k", "gpt-4-32k-0314", "gpt-4-32k-v0314"],
#     },
# )

config_list = [
    {
        'model': 'gpt-3.5-turbo',
        'api_key': 'your_openai_key',
    },
]
It first looks for environment variable "OAI_CONFIG_LIST" which needs to be a valid json string. If that variable is not found, it then looks for a json file named "OAI_CONFIG_LIST". It filters the configs by models (you can filter by other keys as well). Only the gpt-4 models are kept in the list based on the filter condition.
The config list looks like the following:
config_list = [
    {
        'model': 'gpt-4',
        'api_key': '<your OpenAI API key here>',
    },
    {
        'model': 'gpt-4',
        'api_key': '<your Azure OpenAI API key here>',
        'api_base': '<your Azure OpenAI API base here>',
        'api_type': 'azure',
        'api_version': '2023-06-01-preview',
    },
    {
        'model': 'gpt-4-32k',
        'api_key': '<your Azure OpenAI API key here>',
        'api_base': '<your Azure OpenAI API base here>',
        'api_type': 'azure',
        'api_version': '2023-06-01-preview',
    },
]
If you open this notebook in colab, you can upload your files by clicking the file icon on the left panel and then choose "upload file" icon.
You can set the value of config_list in other ways you prefer, e.g., loading from a YAML file.
Example Task: Check Stock Price Change
In the example below, let's see how to use the agents in AutoGen to write a python script and execute the script. This process involves constructing a AssistantAgent to serve as the assistant, along with a UserProxyAgent that acts as a proxy for the human user. In this example demonstrated below, when constructing the UserProxyAgent, we select the human_input_mode to "NEVER". This means that the UserProxyAgent will not solicit feedback from the human user. It stops replying when the limit defined by max_consecutive_auto_reply is reached, or when is_termination_msg() returns true for the received message.
- Colab code
# create an AssistantAgent named "assistant"
assistant = autogen.AssistantAgent(
    name="assistant",
    llm_config={
        "seed": 42,  # seed for caching and reproducibility
        "config_list": config_list,  # a list of OpenAI API configurations
        "temperature": 0,  # temperature for sampling
    },  # configuration for autogen's enhanced inference API which is compatible with OpenAI API
)
# create a UserProxyAgent instance named "user_proxy"
user_proxy = autogen.UserProxyAgent(
    name="user_proxy",
    human_input_mode="NEVER",
    max_consecutive_auto_reply=10,
    is_termination_msg=lambda x: x.get("content", "").rstrip().endswith("TERMINATE"),
    code_execution_config={
        "work_dir": "coding",
        "use_docker": False,  # set to True or image name like "python:3" to use docker
    },
)
# the assistant receives a message from the user_proxy, which contains the task description
user_proxy.initiate_chat(
    assistant,
    message="""Compare the 2020 gain for General Motors and Ford.""",
)
- Colab result
user_proxy (to assistant):

Compare the 2020 gain for General Motors and Ford.

--------------------------------------------------------------------------------
assistant (to user_proxy):

To compare the 2020 gain for General Motors and Ford, we need to find the stock prices for both companies at the beginning and end of the year. We can use the Yahoo Finance API to retrieve this information. Here's the Python code to do that:

python
import requests

def get_stock_price(symbol, year, month, day):
    url = f"https://query1.finance.yahoo.com/v7/finance/download/{symbol}?period1={year}-{month}-{day}&period2={year}-{month}-{day}&interval=1d&events=history"
    response = requests.get(url)
    data = response.text.splitlines()
    return float(data[1].split(",")[4])

# Get the stock prices for General Motors
gm_start_price = get_stock_price("GM", 2020, 1, 2)
gm_end_price = get_stock_price("GM", 2020, 12, 31)

# Get the stock prices for Ford
ford_start_price = get_stock_price("F", 2020, 1, 2)
ford_end_price = get_stock_price("F", 2020, 12, 31)

# Calculate the gain for General Motors and Ford
gm_gain = gm_end_price - gm_start_price
ford_gain = ford_end_price - ford_start_price

print("General Motors 2020 gain:", gm_gain)
print("Ford 2020 gain:", ford_gain)


Please note that this code requires the `requests` library to be installed. You can install it by running `pip install requests` in your terminal.

When you run the code, it will output the 2020 gain for General Motors and Ford.

--------------------------------------------------------------------------------

>>>>>>>> EXECUTING CODE BLOCK 0 (inferred language is python)...
user_proxy (to assistant):

exitcode: 1 (execution failed)
Code output:
Traceback (most recent call last):
  File "", line 10, in <module>
    gm_start_price = get_stock_price("GM", 2020, 1, 2)
  File "", line 7, in get_stock_price
    return float(data[1].split(",")[4])
IndexError: list index out of range


--------------------------------------------------------------------------------
assistant (to user_proxy):

I apologize for the error. It seems that there is an issue with retrieving the stock price data from the Yahoo Finance API. Let's try an alternative approach using the yfinance library. Please make sure you have the yfinance library installed by running `pip install yfinance` in your terminal.

Here's the updated code:

python
import yfinance as yf

# Get the stock prices for General Motors
gm = yf.Ticker("GM")
gm_history = gm.history(start="2020-01-02", end="2020-12-31")
gm_start_price = gm_history["Close"].iloc[0]
gm_end_price = gm_history["Close"].iloc[-1]

# Get the stock prices for Ford
ford = yf.Ticker("F")
ford_history = ford.history(start="2020-01-02", end="2020-12-31")
ford_start_price = ford_history["Close"].iloc[0]
ford_end_price = ford_history["Close"].iloc[-1]

# Calculate the gain for General Motors and Ford
gm_gain = gm_end_price - gm_start_price
ford_gain = ford_end_price - ford_start_price

print("General Motors 2020 gain:", gm_gain)
print("Ford 2020 gain:", ford_gain)


Please try running this updated code and let me know if you encounter any further issues.

--------------------------------------------------------------------------------

>>>>>>>> EXECUTING CODE BLOCK 0 (inferred language is python)...
user_proxy (to assistant):

exitcode: 0 (execution succeeded)
Code output:
General Motors 2020 gain: 4.850429534912109
Ford 2020 gain: -0.35643672943115234


--------------------------------------------------------------------------------
assistant (to user_proxy):

Thank you for providing the execution result. Based on the output, the 2020 gain for General Motors (GM) was approximately 4.85, and the 2020 gain for Ford (F) was approximately -0.36.

Please note that the gain is calculated as the difference between the closing price at the end of the year and the closing price at the beginning of the year. Positive gain indicates an increase in stock price, while negative gain indicates a decrease in stock price.

If you have any more questions or need further assistance, feel free to ask.

--------------------------------------------------------------------------------
user_proxy (to assistant):


--------------------------------------------------------------------------------
assistant (to user_proxy):

TERMINATE

--------------------------------------------------------------------------------
The example above involves code execution. In AutoGen, code execution is triggered automatically by the UserProxyAgent when it detects an executable code block in a received message and no human user input is provided. This process occurs in a designated working directory, using a Docker container by default. Unless a specific directory is specified, AutoGen defaults to the autogen/extensions directory. Users have the option to specify a different working directory by setting the work_dir argument when constructing a new instance of the UserProxyAgent.
The whole chat is auto generated.
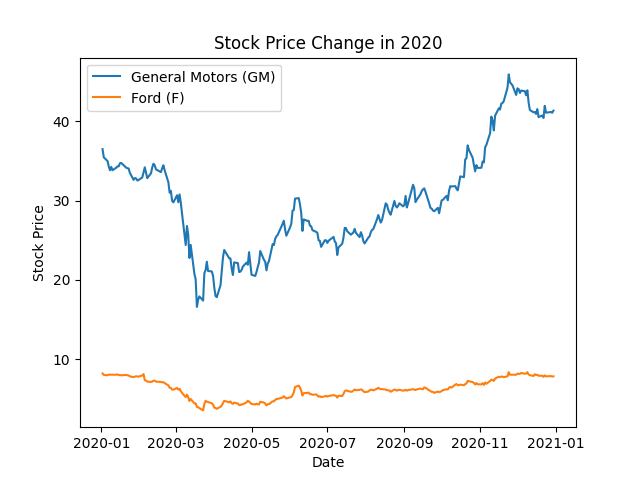
Example Task: Plot Chart
- Colab code
# followup of the previous question
user_proxy.send(
    recipient=assistant,
    message="""Plot a chart of their stock price change of 2020 and save to stock_price_2020.png.""",
)
- Colab result
user_proxy (to assistant):

Plot a chart of their stock price change of 2020 and save to stock_price_2020.png.

--------------------------------------------------------------------------------
assistant (to user_proxy):

To plot a chart of the stock price change for General Motors (GM) and Ford (F) in 2020 and save it as "stock_price_2020.png", we can use the matplotlib library in Python. Please make sure you have the matplotlib library installed by running `pip install matplotlib` in your terminal.

Here's the code to plot the chart and save it as an image:

python
import yfinance as yf
import matplotlib.pyplot as plt

# Get the stock prices for General Motors
gm = yf.Ticker("GM")
gm_history = gm.history(start="2020-01-01", end="2020-12-31")
gm_prices = gm_history["Close"]

# Get the stock prices for Ford
ford = yf.Ticker("F")
ford_history = ford.history(start="2020-01-01", end="2020-12-31")
ford_prices = ford_history["Close"]

# Plot the stock price change
plt.plot(gm_prices.index, gm_prices, label="General Motors (GM)")
plt.plot(ford_prices.index, ford_prices, label="Ford (F)")
plt.xlabel("Date")
plt.ylabel("Stock Price")
plt.title("Stock Price Change in 2020")
plt.legend()

# Save the chart as an image
plt.savefig("stock_price_2020.png")
plt.close()

print("Chart saved as stock_price_2020.png")


Please run this code, and it will generate a chart showing the stock price change for General Motors and Ford in 2020. The chart will be saved as "stock_price_2020.png" in the same directory as the Python script.

Let me know if you need any further assistance.

--------------------------------------------------------------------------------

>>>>>>>> EXECUTING CODE BLOCK 0 (inferred language is python)...
user_proxy (to assistant):

exitcode: 0 (execution succeeded)
Code output:
Chart saved as stock_price_2020.png


--------------------------------------------------------------------------------
assistant (to user_proxy):

Great! The code executed successfully and the chart showing the stock price change for General Motors (GM) and Ford (F) in 2020 has been saved as "stock_price_2020.png".

You can now check the image file "stock_price_2020.png" in the same directory as the Python script to view the chart.

If you have any more questions or need further assistance, feel free to ask.

--------------------------------------------------------------------------------
user_proxy (to assistant):


--------------------------------------------------------------------------------
assistant (to user_proxy):

TERMINATE

--------------------------------------------------------------------------------
Let's display the generated figure.
- Colab code
from IPython.display import Image

Image(filename='coding/stock_price_2020.png')
Copyright statement: Unless otherwise stated, all articles on this blog adopt the CC BY-NC-SA 4.0 license agreement. For non-commercial reprints and citations, please indicate the author: Henry, and original article URL. For commercial reprints, please contact the author for authorization.