Coexistence of Web Applications and VLESS+TCP+XTLS

Note: While VLESS + TCP + XTLS mentioned in this article in 2021 still works perfectly, it's high recommend to take a look at the new xtls-rprx-vision version (2023):
Coexistence of Web Applications and VLESS+TCP+XTLS VISION
1. Intro
Xray-core is a superset of v2ray-core, with better overall performance and a series of enhancements such as XTLS, and is fully compatible with the functions and configurations of v2ray-core.
- There is only one executable file, including ctl function, “run” is the default command.
- The configuration is fully compatible, and the corresponding environment variables and API should be changed to start with XRAY_.
- Open ReadV of bare protocol on all platforms.
- Provide complete VLESS & Trojan XTLS support, both have ReadV.
Special thanks to the founder of Xray: @rprx https://github.com/XTLS, as well as all the contributors.
2. Background
You may be satisfied with the legacy methods, which still work smoothly, like Vmess+TCP, Vmess+WS+TLS, or the latest VLESS+WS+TLS. However, if you deploy them on a relatively powerful server, occupying port 443, it will be such a waste that you cannot directly host any other web applications.
Of course, the easiest way is to directly let VLESS use other ports, such as 8443. But in this case, I always feel that it is not “optimal”(or elegant LUL)...so I am thinking of a configuration scheme that can take the overall situation into consideration. So in the end, what I currently use is the solution in this article: use Nginx to do SNI offloading, so that port 443 can be reused, and eventually the problem of port 443 is perfectly solved.
3. Deployment
3.1 Premise
In this article, I assume you are deploying:
(1) a web app, in this article, NextCloud
(2) a static page, in this article, a webgame
(3) VLESS+TCP+XTLS
3.2 Install dependencies
First, you need to install Nginx and the stream module of Nginx. This module has a package on Ubuntu that can be installed directly.
apt -y update
apt -y install curl git nginx libnginx-mod-stream python3-certbot-nginx
Run the following script to install(and further upgrade) Xray.
bash -c "$(curl -L https://github.com/XTLS/Xray-install/raw/main/install-release.sh)" @ install
(Optional) Uninstall script
bash -c "$(curl -L https://github.com/XTLS/Xray-install/raw/main/install-release.sh)" @ remove
3.3 Config the Nginx main conf.d
nano /etc/nginx/nginx.conf
Add the following configuration outside the “http block”
stream {
        map $ssl_preread_server_name $example_multi {
                webgame.example.com xtls;
                nextcloud.example.com nextcloud;
        }
        upstream xtls {
                server 127.0.0.1:20001; # Xray port
        }
        upstream nextcloud {
                server 127.0.0.1:20002; # Nextcloud port
        }
        server {
                listen 443      reuseport;
                listen [::]:443 reuseport;
                proxy_pass      $example_multi;
                ssl_preread     on;
        }
}
In the above configuration, there are two domains.
(1) webgame.example.com
(2) nextcloud.example.com
The first upstream domain name is required, for the purpose of Xray. The second (or the third to Nth) upstream(s) are the domain names of other websites, in this case, NextCloud.
It is particularly important to note that since port 443 is monitored in the stream block, other Nginx configuration files can no longer listen to port 443, otherwise an error will be reported when Nginx starts.
In addition, to ensure SNI offloading working normally, the premise is that the “listen” on port 443 in your other Nginx configuration files needs to be changed to the port you specify in upstream, in this case, port 20002.
3.4 Config fallback
Next, build a fallback site for VLESS, which also can be called a “camouflage site”. You can simply put a static page here. Here I made a small game, 2048.
cd /var/www/html
git clone https://github.com/gd4Ark/2048.git 2048
Now create a new Nginx configuration file for the fallback site:
nano /etc/nginx/conf.d/fallback.conf
Write the following configuration:
server {
        listen 80;
        server_name webgame.example.com;
        if ($host = webgame.example.com) {
                return 301 https://$host$request_uri;
        }
        server_name nextcloud.example.com;
        if ($host = nextcloud.example.com) {
                return 301 https://$host$request_uri;
        }
        return 404;
}

server {
        listen 127.0.0.1:20009;
        server_name webgame.example.com;
        index index.html;
        root /var/www/html/2048;
}
It should be noted here that the fallback site does not need to configure SSL. If VLESS drops the request back to this site, this site automatically supports SSL.
You only need to ensure that the server_name of the fallback site and the Xray server domain name configured in the stream block are the same. For example in this article: webgame.example.com
In addition, like I said before, “listen” cannot listen on port 443. Here you can change any other unoccupied port, such as port 20009 in the above configuration, then port 20009 is the fallback port.
3.5 Config SSL
Now we need to use certbot to issue an SSL certificate. As mentioned before, SSL is not required for the fallback site, so certbot here uses the following command to generate only the certificate without modifying the nginx configuration file:
certbot certonly --nginx
Copy the generated certificate to the Xray configuration directory:
cp /etc/letsencrypt/live/webgame.example.com/fullchain.pem /usr/local/etc/xray/fullchain.pem
cp /etc/letsencrypt/live/webgame.example.com/privkey.pem /usr/local/etc/xray/privkey.pem
Since Xray is managed by systemd, and the user in systemd is nobody, in this case the owner of the certificate should also be changed to nobody, otherwise Xray has no permission to read the certificate file:
chown nobody:nogroup /usr/local/etc/xray/fullchain.pem
chown nobody:nogroup /usr/local/etc/xray/privkey.pem
3.6 Config Xray
Generate and copy an UUID
cat /proc/sys/kernel/random/uuid
Edit the Xray config.json
nano /usr/local/etc/xray/config.json
Make config.json empty and then config as follows:
{
    "log": {
        "loglevel": "warning"
    },
    "inbounds": [
        {
            "listen": "127.0.0.1", # Only listen locally to prevent detection of the following port 20001
            "port": 20001, # The port here corresponds to the upstream port in Nginx
            "protocol": "vless",
            "settings": {
                "clients": [
                    {
                        "id": "1c0022ae-3f18-41ab-93a7-5e85cf883fde", # fill in your UUID
                        "flow": "xtls-rprx-direct",
                        "level": 0
                    }
                ],
                "decryption": "none",
                "fallbacks": [
                    {
                        "dest": "20009" # port of fallback site
                    }
                 ]
            },
            "streamSettings": {
                "network": "tcp",
                "security": "xtls",
                "xtlsSettings": {
                    "alpn": [
                        "http/1.1"
                    ],
                    "certificates": [
                        {
                            "certificateFile": "/usr/local/etc/xray/fullchain.pem", # your domain cert, absolute path
                            "keyFile": "/usr/local/etc/xray/privkey.pem" # your private key, absolute path
                        }
                    ]
                }
            }
        }
    ],
    "outbounds": [
        {
            "protocol": "freedom"
        }
    ]
}
3.7 Install NextCloud via Docker
Install Docker
curl -sSL https://get.docker.com/ | sh
systemctl enable docker
Install Docker Compose (check latest version yourself)
curl -L https://github.com/docker/compose/releases/download/1.27.4/docker-compose-`uname -s`-`uname -m` -o /usr/local/bin/docker-compose
chmod +x /usr/local/bin/docker-compose
3.8 Config docker-compose file of NextCloud
In this case I’m using the Base version (apache) of NextCloud Docker image, because This setup provides no SSL encryption and is intended to run behind a proxy.
nano docker-compose.yml
version: '3'

volumes:
  nextcloud:
  db:

services:
  db:
    image: mariadb
    restart: always
    command: --transaction-isolation=READ-COMMITTED --binlog-format=ROW
    volumes:
      - db:/var/lib/mysql
    environment:
      - MYSQL_ROOT_PASSWORD=your_root_password
      - MYSQL_PASSWORD=your_password
      - MYSQL_DATABASE=nextcloud
      - MYSQL_USER=nextcloud

  app:
    image: nextcloud
    restart: always
    ports:
      - 127.0.0.1:20010:80 # this local port 20010 is to be proxied by Nginx
    links:
      - db
    volumes:
      - nextcloud:/var/www/html
    environment:
      - MYSQL_PASSWORD=your_password
      - MYSQL_DATABASE=nextcloud
      - MYSQL_USER=nextcloud
      - MYSQL_HOST=db
Run docker-compose
docker-compose up -d
3.9 Config nextcloud.conf
So the main nginx.conf includes:
(1) fallback.conf, for Xray fallback purpose;
(2) nextcloud.conf, for NextCloud deployment.
nano /etc/nginx/conf.d/nextcloud.conf
Edit the .conf file as follows
server {
  listen 127.0.0.1:20002 ssl; # match the NextCloud port setting in 3.3

  ssl_certificate       /etc/letsencrypt/live/nextcloud.example.com/fullchain.pem;
  ssl_certificate_key   /etc/letsencrypt/live/nextcloud.example.com/privkey.pem;
#ssl_dhparam          /your/path/dhparams.pem; #optional
#Authenticated Origin Pull is optional. Please refer to https://developers.cloudflare.com/ssl/origin/authenticated-origin-pull/
#ssl_client_certificate  /etc/ssl/origin-pull-ca.pem;
#ssl_verify_client on;
  ssl_session_timeout 1d;
  ssl_session_cache shared:MozSSL:10m;
  ssl_session_tickets off;

  client_max_body_size 10G; # define your max_upload_file_size

  ssl_protocols         TLSv1.2 TLSv1.3;
  ssl_ciphers           ECDHE-ECDSA-AES128-GCM-SHA256:ECDHE-RSA-AES128-GCM-SHA256:ECDHE-ECDSA-AES256-GCM-SHA384:ECDHE-RSA-AES256-GCM-SHA384:ECDHE-ECDSA-CHACHA20-POLY1305:ECDHE-RSA-CHACHA20-POLY1305:DHE-RSA-AES128-GCM-SHA256:DHE-RSA-AES256-GCM-SHA384;
  ssl_prefer_server_ciphers off;

  server_name           nextcloud.example.com;
    add_header Content-Security-Policy upgrade-insecure-requests;
  location / {
    proxy_redirect off;
    proxy_pass http://127.0.0.1:20010; #The port 20010 must match the port setting of Nextcloud docker-compose file.
    proxy_http_version 1.1;
    proxy_set_header Upgrade $http_upgrade;
    proxy_set_header Connection "upgrade";
    proxy_set_header Host $host;
    proxy_set_header X-Real-IP $remote_addr;
    proxy_set_header X-Forwarded-For $proxy_add_x_forwarded_for;
  }
}
Note that the certificate file and key file in /usr/local/etc/xray/ is different from the ones in /etc/letsencrypt/live/nextcloud.example.com/
You can use certbot again to issue certs. Also feel free to try CloudFlare Original Certificate. The tutorial is Use CloudFlare Certificate with Nginx + V2RAY + WebSocket +TLS + CDN If you choose to use CloudFlare Original CA, you have to turn DNS proxy ON.
3.10 Test run
Check Nginx syntax
nginx -t
Check Xray syntax
cd /usr/local/etc/xray/
xray --test
After confirming that the above configurations are correct, set Nginx and Xray to start automatically
systemctl enable nginx xray
Restart Nginx and Xray to make the new configuration take effect
systemctl restart nginx xray
4. Client Setting
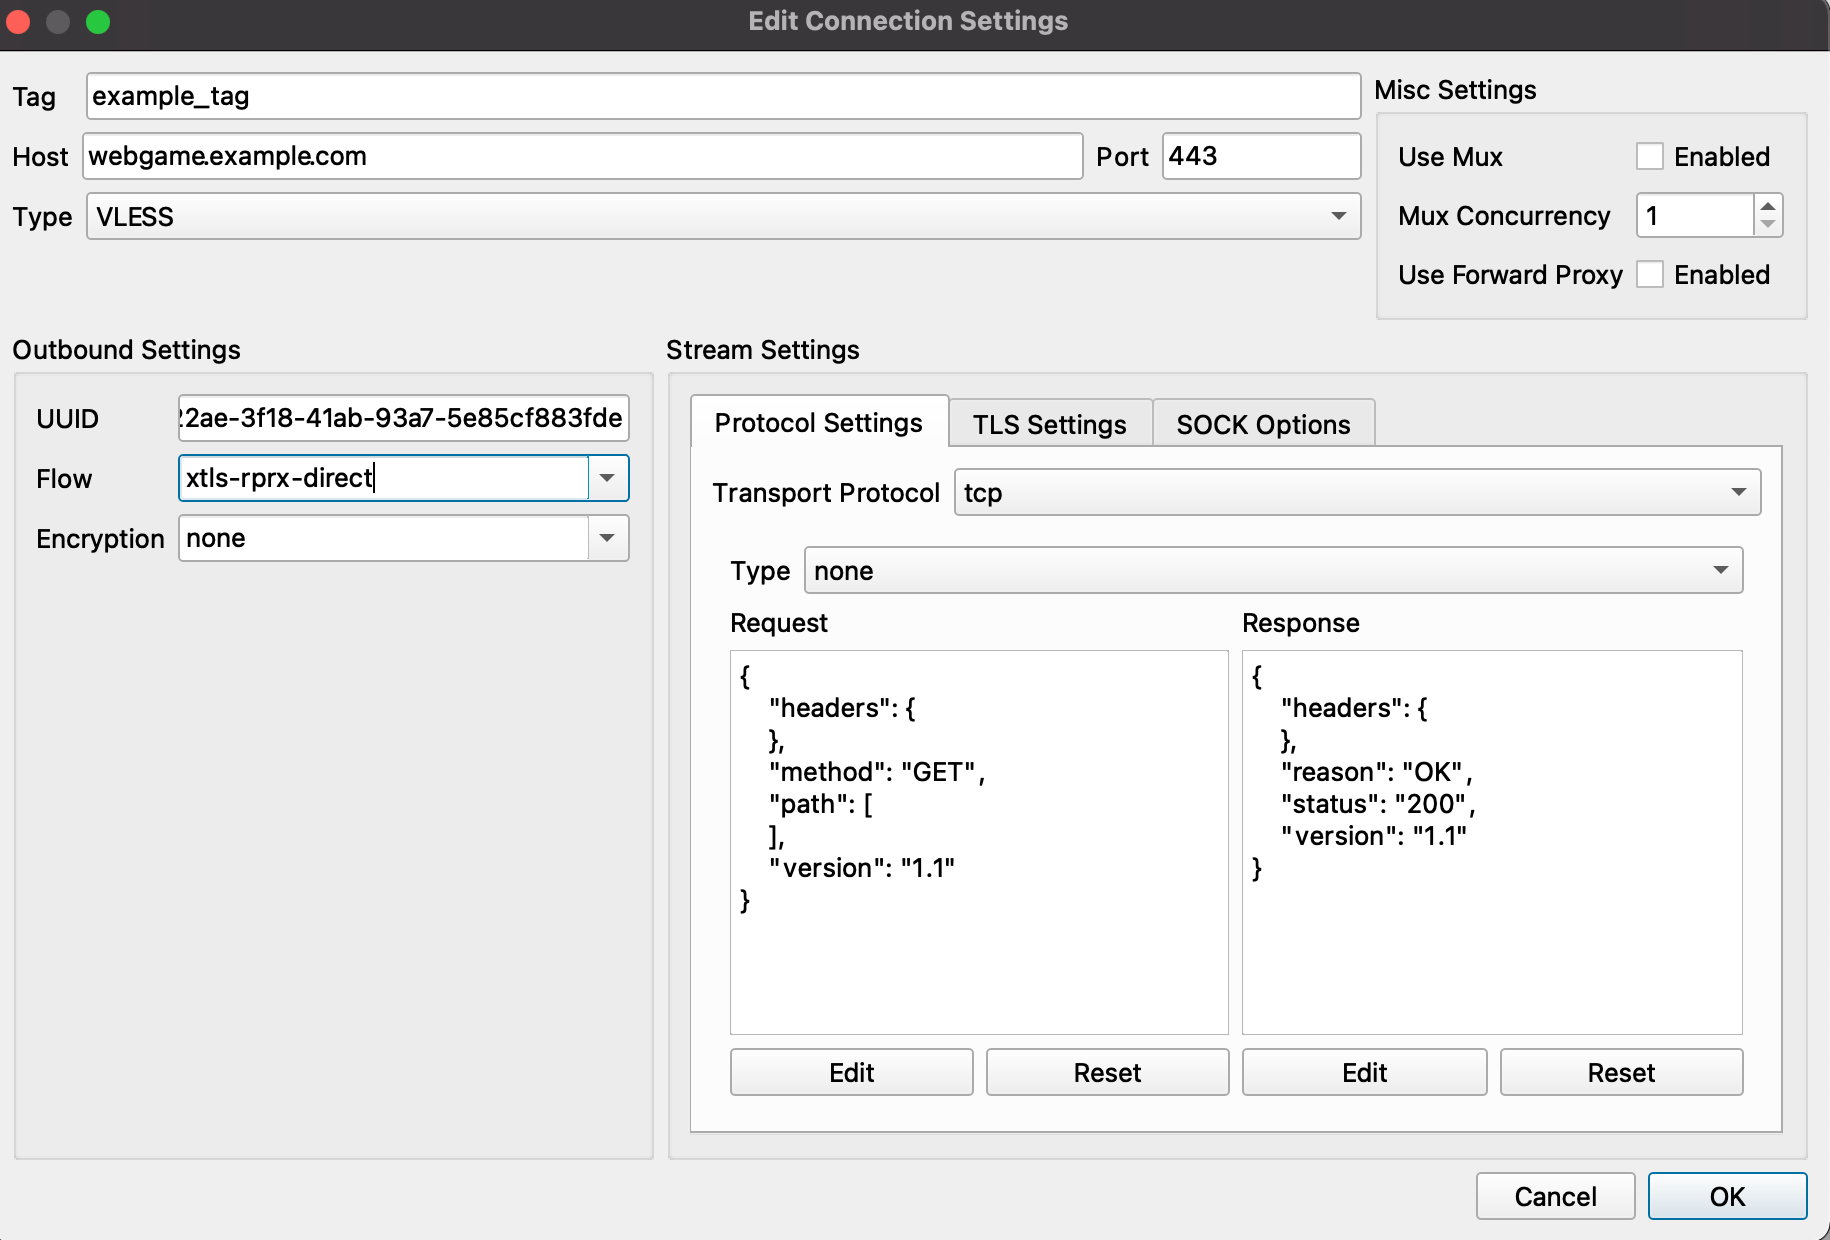
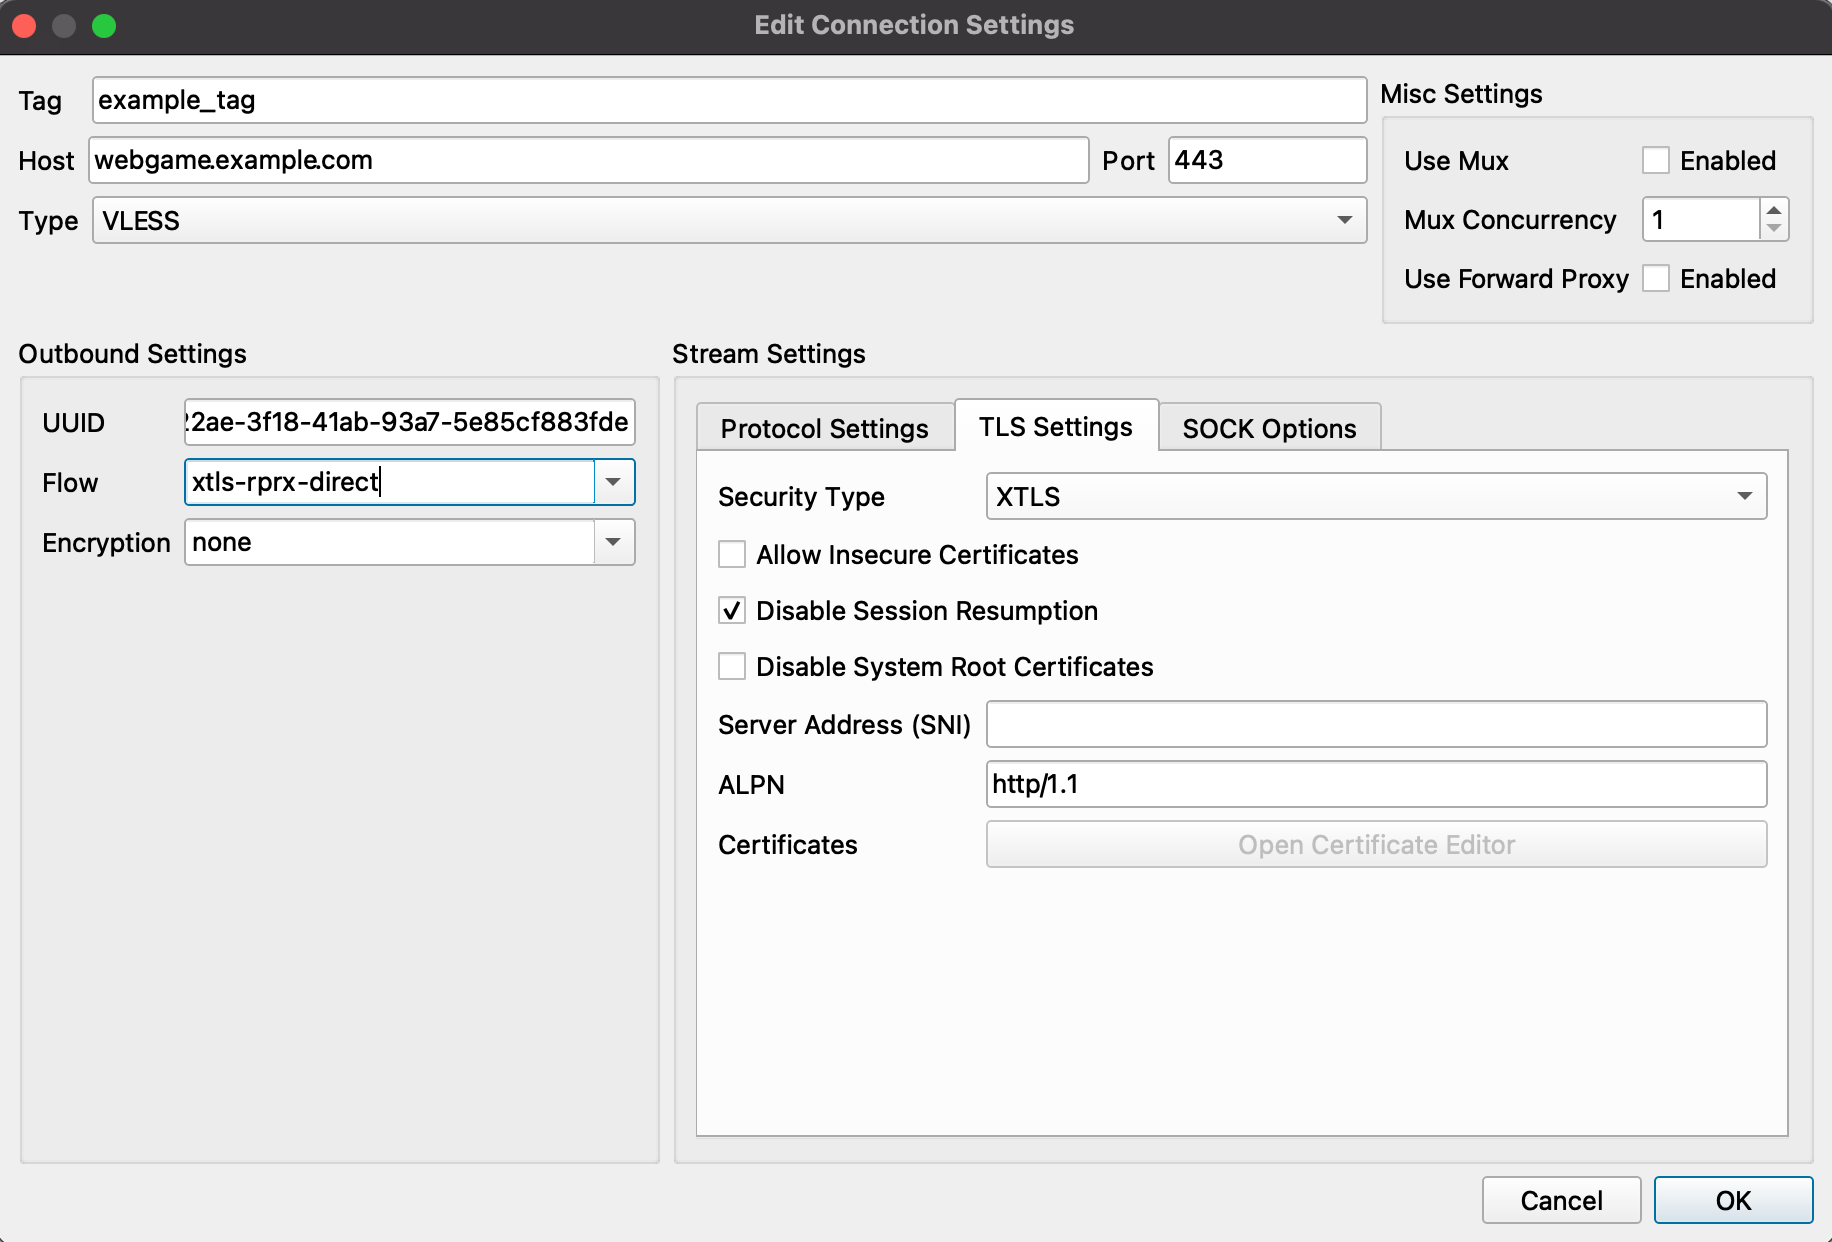
In this article we use Qv2ray as an example, for it now supports Xray-core & XTLS, also its advantage of cross-platform.


- Host: webgame.example.com
- Port: 443
- Type: VLESS
- UUID: the one in config.json
- Flow: xtls-rprx-direct
- Transport Protocal: tcp
- Security Type: XTLS
Enjoy!
If you have any question, feel free to leave a comment.
Copyright statement: Unless otherwise stated, all articles on this blog adopt the CC BY-NC-SA 4.0 license agreement. For non-commercial reprints and citations, please indicate the author: Henry, and original article URL. For commercial reprints, please contact the author for authorization.
