Image Recognition with Gemini Pro Vision: A Practical Tutorial
You can include text, images, and video in your prompt requests and get text or code responses

Welcome to the world of image recognition with Gemini Pro Vision! This powerful multimodal AI model can extract insights and answer questions based on what it sees in images. In this tutorial, we'll build a simple web app that shows off Gemini's capabilities in action.


Project Structure
Before diving in, let's take a look at the project structure:
.
├── main.py (Python script for interacting with Gemini)
├── .env (contains API key)
├── gemini.png (icon)
└── web (Contains web app files)
    ├── gemini-api.js (JavaScript for making API calls to Gemini)
    ├── gemini.png (Placeholder image for demonstration)
    ├── index.html (Main HTML page of the web app)
    ├── main.js (JavaScript for handling UI interactions)
    └── style.css (Styles for the web app)
Building the Web App
- Python Script (main.py): This script handles communication with the Gemini API using the downloaded service account credentials. You'll need to update the script with your project's specific details.
# Import necessary libraries
import json
import os
from dotenv import load_dotenv

# Importing the generativeai module from the google package
import google.generativeai as genai
from flask import Flask, jsonify, request, send_file, send_from_directory

# Load environment variables from a .env file
load_dotenv()
API_KEY = os.getenv('API_KEY')

# Configure the generativeai module with the provided API key
genai.configure(api_key=API_KEY)

# Create a Flask web application instance
app = Flask(__name__)

# Define the route for the root URL ("/"), serving the index.html file
@app.route("/")
def index():
    return send_file('web/index.html')

# Define an API route ("/api/generate") for content generation using the generative model
@app.route("/api/generate", methods=["POST"])
def generate_api():
    # Check if the request method is POST
    if request.method == "POST":
        # Check if API key is not set
        if API_KEY == 'TODO':
            return jsonify({ "error": '''
                To get started, get an API key at
                https://makersuite.google.com/app/apikey and enter it in
                main.py
                '''.replace('\n', '') })
        try:
            # Get JSON content from the request body
            req_body = request.get_json()
            content = req_body.get("contents")

            # Create a GenerativeModel instance with the specified model name
            model = genai.GenerativeModel(model_name=req_body.get("model"))

            # Generate content using the model and stream the response
            response = model.generate_content(content, stream=True)

            # Define a generator function for streaming the content chunks
            def stream():
                for chunk in response:
                    yield 'data: %s\n\n' % json.dumps({ "text": chunk.text })

            # Return the streamed content with the appropriate content type
            return stream(), {'Content-Type': 'text/event-stream'}

        except Exception as e:
            # Return an error message if an exception occurs during content generation
            return jsonify({ "error": str(e) })

# Define a route to serve static files from the 'web' directory
@app.route('/<path:path>')
def serve_static(path):
    return send_from_directory('web', path)

# Run the Flask app on the specified port (default: 3002)
if __name__ == "__main__":
    app.run(port=int(os.environ.get('PORT', 3002)))
- .env
API_KEY='your_gemini_api_key'
- Web App (web folder):
- index.html: This is the main HTML page of the app. It displays the UI elements like an image upload button and a text area for displaying results.
<!DOCTYPE html>
<html lang="en">
  <head>
    <!-- Set character set and viewport for better rendering on different devices -->
    <meta charset="UTF-8" />
    <meta name="viewport" content="width=device-width, initial-scale=1.0" />
    <!-- Set the title of the webpage -->
    <title>Gemini Pro Vision Demo</title>
    <!-- Link to an external stylesheet for styling purposes -->
    <link rel="stylesheet" href="/style.css" />
  </head>

  <body>
    <main>
      <!-- Main heading of the webpage -->
      <h1>Identify your image with Gemini</h1>
      <!-- Form for image identification -->
      <form id="imageForm">
        <!-- Container for image selection -->
        <div class="image-picker">
          <!-- Label for the image choice -->
          <label class="image-choice" id="imageLabel">
            <!-- Radio button for image selection -->
            <input
              type="radio"
              name="chosen-image"
              value=""
              onchange="handleImageChange(this)"
            />
            <!-- Preview image element (initially hidden) -->
            <img id="previewImage" style="display: none" />
            <!-- Button to trigger image upload -->
            <button type="button" onclick="uploadImage()">Upload Image</button>
            <!-- Input field for file selection (initially hidden) -->
            <input
              type="file"
              id="imageInput"
              accept="image/*"
              style="display: none"
              onchange="handleFileSelect()"
            />
          </label>
        </div>
        <!-- Container for user prompt and submission -->
        <div class="prompt-box">
          <!-- Input field for user prompt -->
          <label>
            <input
              name="prompt"
              placeholder="Enter instructions here"
              type="text"
              value="Describe the image"
            />
          </label>
          <!-- Button to submit the form -->
          <button type="submit" onclick="submitForm()">Go</button>
        </div>
      </form>
      <!-- Placeholder for displaying results -->
      <p class="output">(Results will appear here)</p>
    </main>

    <!-- Include external scripts for Markdown processing and Base64 encoding/decoding -->
    <script src="https://unpkg.com/[email protected]/dist/markdown-it.min.js"></script>
    <script src="https://unpkg.com/[email protected]/base64js.min.js"></script>
    <!-- Include the main JavaScript file for the webpage -->
    <script type="module" src="/main.js"></script>

    <!-- Inline script for handling image-related functionality -->
    <script>
      function handleImageChange(element) {
        // Get necessary DOM elements
        var previewImage = document.getElementById("previewImage");
        var imageLabel = document.getElementById("imageLabel");

        // Toggle the display of preview image and image label based on radio button state
        if (element.checked) {
          previewImage.style.display = "inline";
          imageLabel.style.display = "block";
        } else {
          previewImage.style.display = "none";
          imageLabel.style.display = "none";
        }
      }

      function uploadImage() {
        // Trigger the click event of the hidden image input field
        document.getElementById("imageInput").click();
      }

      function handleFileSelect() {
        // Get necessary DOM elements
        var fileInput = document.getElementById("imageInput");
        var previewImage = document.getElementById("previewImage");
        var imageLabel = document.getElementById("imageLabel");

        // Check if a file is selected
        if (fileInput.files && fileInput.files[0]) {
          // Read the selected file as a data URL
          var reader = new FileReader();

          reader.onload = function (e) {
            // Display the selected image in the preview and set its value to the input field
            previewImage.src = e.target.result;
            previewImage.style.display = "inline";
            imageLabel.querySelector("input").value = e.target.result;
          };

          reader.readAsDataURL(fileInput.files[0]);
        }
      }

      function submitForm() {
        // Get the form element and create FormData object
        var form = document.getElementById("imageForm");
        var formData = new FormData(form);

        // Log form data entries to the console
        for (var pair of formData.entries()) {
          console.log(pair[0] + ": " + pair[1]);
        }
      }
    </script>
  </body>
</html>
- gemini-api.js: This JavaScript file makes API calls to the Gemini endpoint using the JS as an intermediary.
/**
 * Calls the given Gemini model with the given image and/or text
 * parts, streaming output (as a generator function).
 */
export async function* streamGemini({
  model = 'gemini-pro-vision', // use 'gemini-pro' for text -> text
  contents = [],
} = {}) {
  // Send the prompt to the Python backend
  // Call API defined in main.py
  let response = await fetch("/api/generate", {
    method: "POST",
    headers: { "content-type": "application/json" },
    body: JSON.stringify({ model, contents })
  });

  yield* streamResponseChunks(response);
}

/**
 * A helper that streams text output chunks from a fetch() response.
 */
async function* streamResponseChunks(response) {
  let buffer = '';

  const CHUNK_SEPARATOR = '\n\n';

  let processBuffer = async function* (streamDone = false) {
    while (true) {
      let flush = false;
      let chunkSeparatorIndex = buffer.indexOf(CHUNK_SEPARATOR);
      if (streamDone && chunkSeparatorIndex < 0) {
        flush = true;
        chunkSeparatorIndex = buffer.length;
      }
      if (chunkSeparatorIndex < 0) {
        break;
      }

      let chunk = buffer.substring(0, chunkSeparatorIndex);
      buffer = buffer.substring(chunkSeparatorIndex + CHUNK_SEPARATOR.length);
      chunk = chunk.replace(/^data:\s*/, '').trim();
      if (!chunk) {
        if (flush) break;
        continue;
      }
      let { error, text } = JSON.parse(chunk);
      if (error) {
        console.error(error);
        throw new Error(error?.message || JSON.stringify(error));
      }
      yield text;
      if (flush) break;
    }
  };

  const reader = response.body.getReader();
  try {
    while (true) {
      const { done, value } = await reader.read()
      if (done) break;
      buffer += new TextDecoder().decode(value);
      console.log(new TextDecoder().decode(value));
      yield* processBuffer();
    }
  } finally {
    reader.releaseLock();
  }

  yield* processBuffer(true);
}
- main.js: This file handles user interactions like uploading images and triggering analysis.
import { streamGemini } from './gemini-api.js';

let form = document.querySelector('form');
let promptInput = document.querySelector('input[name="prompt"]');
let output = document.querySelector('.output');

form.onsubmit = async (ev) => {
  ev.preventDefault();
  output.textContent = 'Generating...';

  try {
    // Load the image as a base64 string
    let imageUrl = form.elements.namedItem('chosen-image').value;
    let imageBase64 = await fetch(imageUrl)
      .then(r => r.arrayBuffer())
      .then(a => base64js.fromByteArray(new Uint8Array(a)));

    // Assemble the prompt by combining the text with the chosen image
    let contents = [
      {
        role: 'user',
        parts: [
          { inline_data: { mime_type: 'image/jpeg', data: imageBase64, } },
          { text: promptInput.value }
        ]
      }
    ];

    // Call the gemini-pro-vision model, and get a stream of results
    let stream = streamGemini({
      model: 'gemini-pro-vision',
      contents,
    });

    // Read from the stream and interpret the output as markdown
    let buffer = [];
    let md = new markdownit();
    for await (let chunk of stream) {
      buffer.push(chunk);
      output.innerHTML = md.render(buffer.join(''));
    }
  } catch (e) {
    output.innerHTML += '<hr>' + e;
  }
};
- style.css: Defines the app's styles.
body {
  margin: 24px;
  font-family: system-ui, -apple-system, BlinkMacSystemFont, 'Segoe UI', Roboto, Oxygen, Ubuntu, Cantarell, 'Open Sans', 'Helvetica Neue', sans-serif;
  -webkit-font-smoothing: antialiased;
  --accent-color: #076EFF;
  color: #202124;
}

main {
  width: 100%;
  padding: 24px;
  max-width: 460px;
  margin: 0 auto;
  border-radius: 20px;
}

* {
  outline-color: var(--accent-color);
}

main {
  background-color: #fff;
}

h1 {
  display: flex;
  align-items: center;
  gap: 8px;
  margin: 0 auto;
  font-size: 24px;
}

h1::before {
  content: '';
  display: inline-block;
  background: url(gemini.png);
  width: 40px;
  height: 40px;
  background-size: cover;
}

form {
  margin: 0;
}

.image-picker {
  display: flex;
  width: 100%;
  gap: 8px;
  margin-top: 24px;
}

.image-choice {
  position: relative;
  border-radius: 8px;
  overflow: hidden;
  cursor: pointer;
}

.image-choice:has(:checked)::before {
  pointer-events: none;
  position: absolute;
  right: 8px;
  top: 8px;
  z-index: 1;
  color: white;
  content: '✓';
  background-color: var(--accent-color);
  width: 16px;
  height: 16px;
  display: grid;
  place-items: center;
  font-weight: bold;
  border-radius: 100px;
  box-shadow: 0 0 0 2px #fff;
}

.image-choice:has(:checked)::after {
  content: '';
  position: absolute;
  pointer-events: none;
  inset: 0;
  border-radius: 8px;
  box-shadow:
    0 0 0 2px var(--accent-color) inset,
    0 0 0 4px #fff inset;
}

.image-choice img {
  width: 100%;
}

.image-choice input {
  opacity: 0;
  position: absolute;
}

.image-choice:focus-within::after {
  box-shadow: 0 0 0 4px var(--accent-color) inset;
}

.prompt-box {
  margin: 24px 0;
  width: 100%;
  display: flex;
  gap: 8px;
  align-items: flex-end;
}

label {
  display: flex;
  flex: 1;
  flex-direction: column;
  gap: 8px;
  font-size: 12px;
}

input,
button {
  border: 1px solid #ddd;
  border-radius: 8px;
  padding: 12px 16px;
  font-family: unset;
  font-size: 16px;
}

button {
  border-color: var(--accent-color);
  background-color: var(--accent-color);
  color: white;
  font-weight: bold;
  cursor: pointer;
  opacity: 1;
}

button:focus-visible {
  outline: 2px solid white;
  outline-offset: -4px;
}

button:hover {
  opacity: 0.95;
}
- gemini.png

Running the App
- Open a terminal in the project directory.
- Run
python main.pyto start the Python script. - Open
localhost:3002in your web browser. - Click the "Upload Image" button and select an image to upload.
- Click the "Go" button.
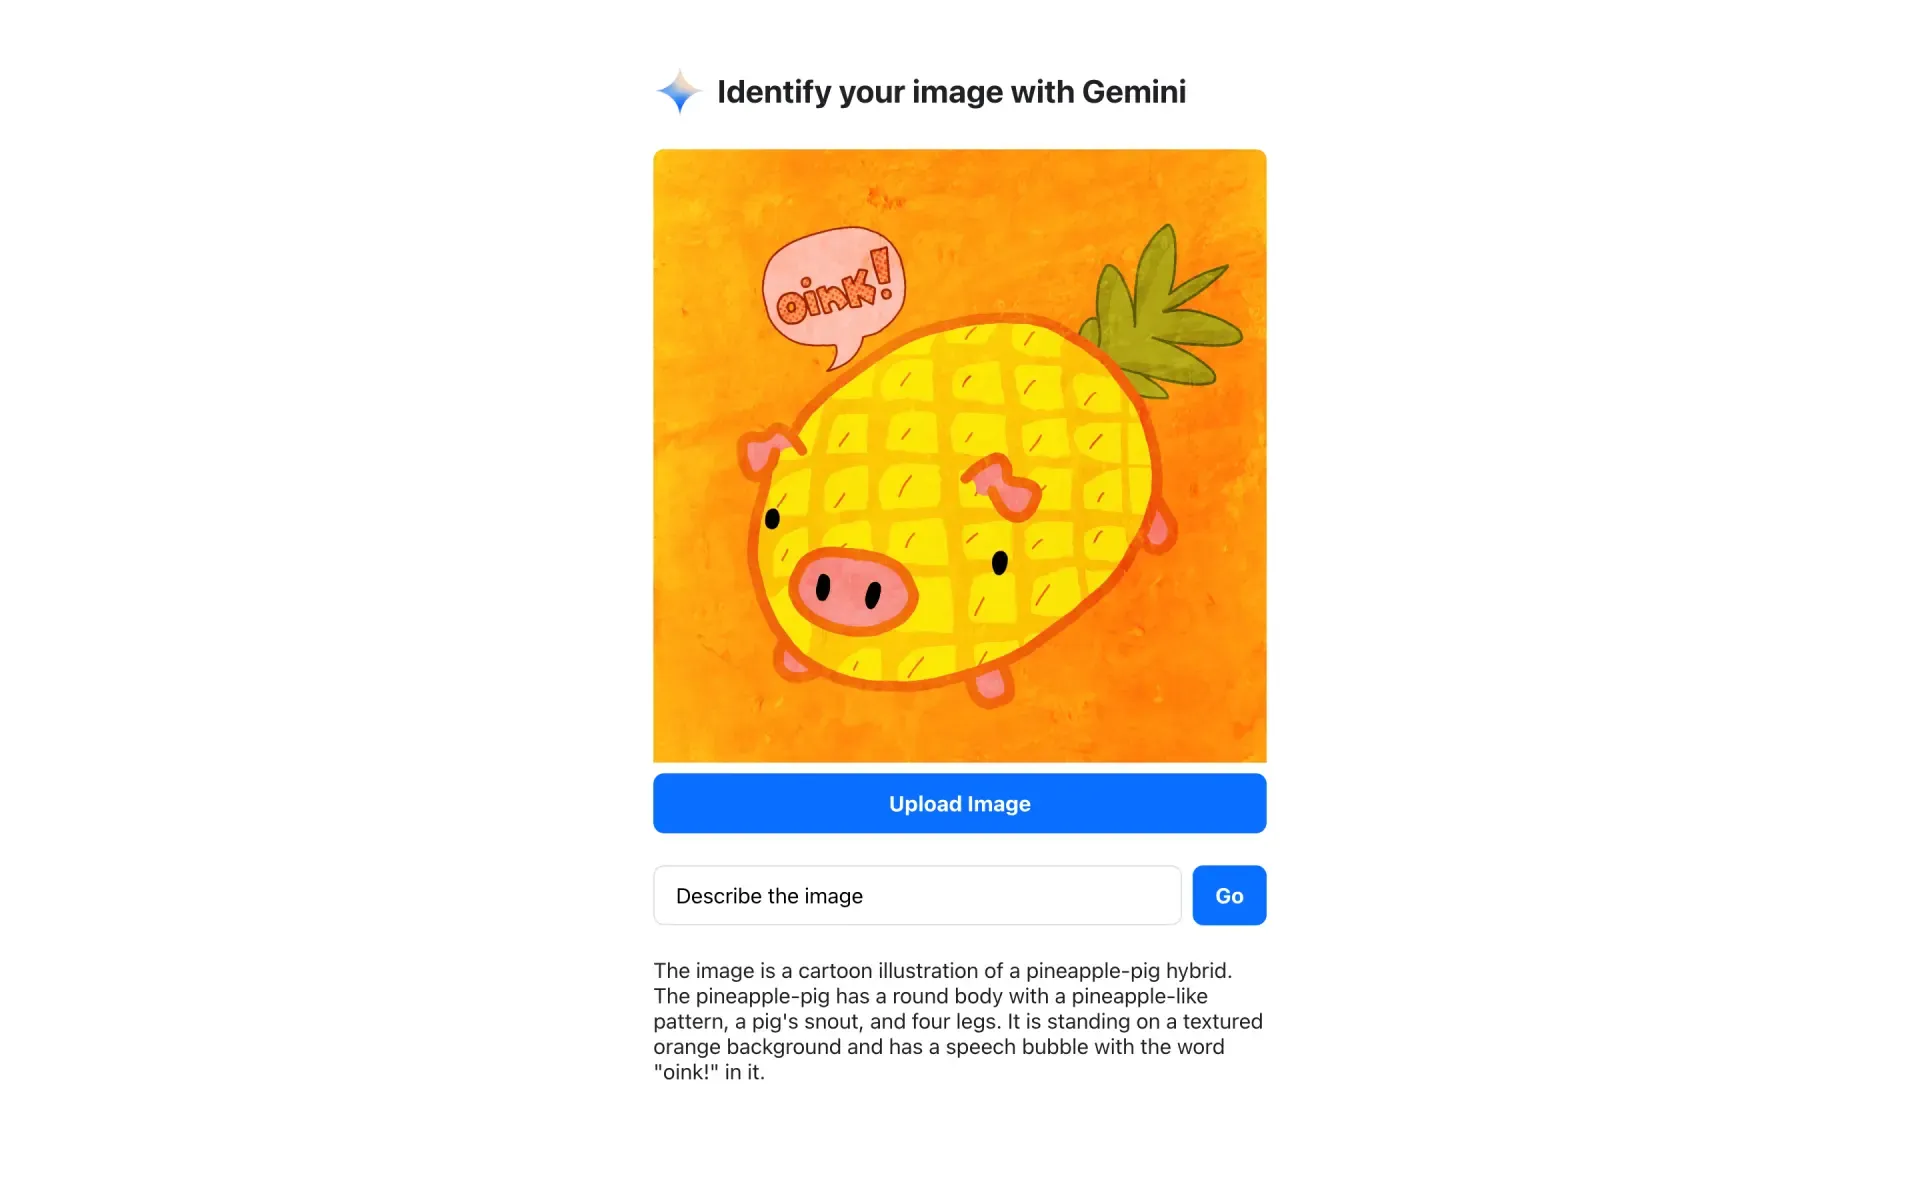
Analyzing the Image
The app will send the uploaded image to the Gemini API through the Python script. Gemini will then analyze the image and return a response summarizing its contents. This response will be displayed in the text area on the web page.
Next Steps
This is just a basic example to get you started. You can extend the app's functionality in many ways:
- Multiple images: Allow uploading and analyzing multiple images at once.
- Different prompts: Use different text prompts to guide Gemini's analysis and focus on specific aspects of the image.
- Visualizations: Display the extracted information in a more engaging way using charts or annotations on the image.
- Real-world applications: Integrate Gemini into your own projects, like analyzing product images for e-commerce websites or medical images for healthcare applications.
I hope this tutorial helps you get started with your image recognition project using Gemini Pro Vision.
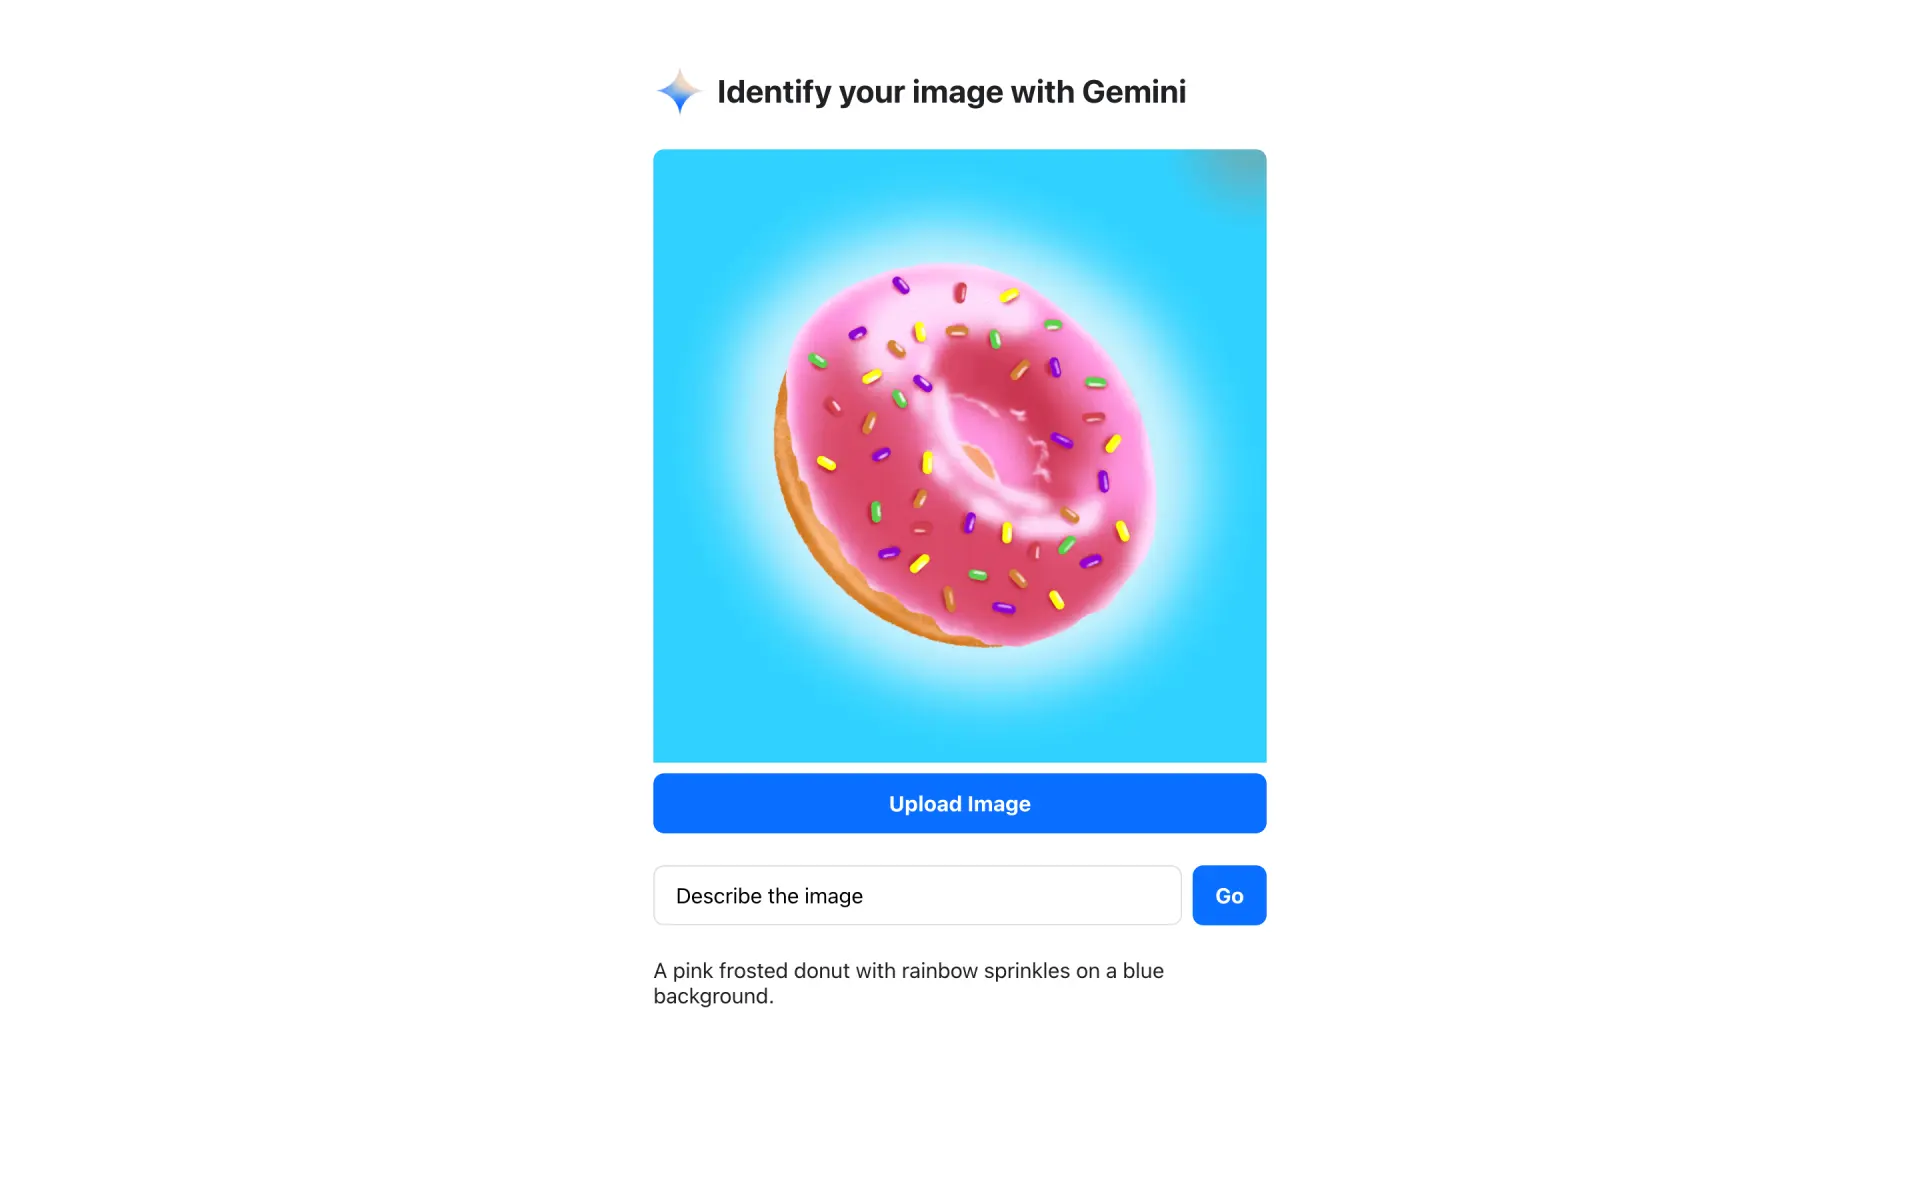
Demo
Copyright statement: Unless otherwise stated, all articles on this blog adopt the CC BY-NC-SA 4.0 license agreement. For non-commercial reprints and citations, please indicate the author: Henry, and original article URL. For commercial reprints, please contact the author for authorization.