Complete Guide of MinIO Docker Deployment
Self-hosted objective storage

1. Background
MinIO is a High Performance Object Storage released under GNU Affero General Public License v3.0. It is API compatible with the Amazon S3 cloud storage service. It can handle unstructured data such as photos, videos, log files, backups, and container images with a current maximum supported object size of 5TB.
In this article, I will introduce the docker deployment of MinIO, with Nginx configs, DNS bucket configs, and user permission settings.
2. Pre-Requisites
Get DNS records ready for your domain (example, you can have your own names)
- minio.example.com This is for API
- minioconsole.example.com This is for console
- testbucket.minio.example.com This is for DNS style bucket (virtual hosted style)
Get essentials and docker
apt -y update
apt -y install curl nginx python3-certbot-nginx
curl -fsSL https://get.docker.com -o get-docker.sh
sh get-docker.sh
Create MinIO folder
cd /your/path
mkdir minio && cd minio
nano docker-compose.yml
Edit the compose file
version: '3.8'

services:
  minio:
    image: minio/minio:latest
    container_name: minio
    restart: unless-stopped
    environment:
      - MINIO_DOMAIN=minio.example.com
      - MINIO_SERVER_URL=https://minio.example.com
      - MINIO_BROWSER_REDIRECT_URL=https://minioconsole.example.com
      - MINIO_ROOT_USER=example_user
      - MINIO_ROOT_PASSWORD=example_password
    ports:
      - "127.0.0.1:9000:9000"
      - "127.0.0.1:9090:9090"
    volumes:
      - ./data:/data
    healthcheck:
      test: ["CMD", "curl", "-f", "http://localhost:9000/minio/health/live"]
      interval: 30s
      timeout: 20s
      retries: 3
    command: server /data --console-address ":9090"
MINIO_DOMAINis used to enable the DNS style bucket (virtual hosted style). Note that the domain name filled in after this variable should not addhttps://.MINIO_SERVER_URLactually refers to the domain name of the API service. When configuring the reverse proxy, it is necessary to correctly fill in the domain name used by the reverse proxy server.MINIO_BROWSER_REDIRECT_URLrefers to the domain name of the console. In the case of configuring a reverse proxy, you must also fill in the domain name used for the reverse generation server. At the same time, you cannot use the same domain name as the API service. Using the same domain name will result in various issues.Port 9000is the API service port, and port9090is the console port.
Bring up the container
docker-compose up -d
systemctl enable docker
3. Nginx Configuration
Assume you have the same Nginx SNI settings in Coexistence of Web Applications and VLESS+TCP+XTLS VISION
Apply SSL cert for your domains. Try --dry-run first
certbot certonly --dry-run
Choose the Nginx plugin, type your domain(s). If it’s successful. Go without --dry-run
certbot certonly
Edit nginx.conf
nano /etc/nginx/nginx.conf
Add stream block at the bottom of nginx.conf
stream {
        map $ssl_preread_server_name $example_sni {
                minio.example.com minio;
                minioconsole.example.com minioconsole;
                bucket1.minio.example.com testbucket;
        }
        upstream minio {
                server 127.0.0.1:30001;
        }
        upstream minioconsole {
                server 127.0.0.1:30002;
        }
        upstream testbucket {
                server 127.0.0.1:30003;
        }
        server {
                listen 443      reuseport;
                listen [::]:443 reuseport;
                proxy_pass      $example_sni;
                ssl_preread     on;
        }
}
Edit minio.conf
nano /etc/nginx/conf.d/minio.conf
server {
  listen 127.0.0.1:30001 ssl http2;

  ssl_certificate       /your/path/fullchain.pem;
  ssl_certificate_key   /your/path/privkey.pem;
  ssl_session_timeout 1d;
  ssl_session_cache shared:MozSSL:10m;
  ssl_session_tickets off;

  ssl_protocols         TLSv1.2 TLSv1.3;
  ssl_ciphers           ECDHE-ECDSA-AES128-GCM-SHA256:ECDHE-RSA-AES128-GCM-SHA256:ECDHE-ECDSA-AES256-GCM-SHA384:ECDHE-RSA-AES256-GCM-SHA384:ECDHE-ECDSA-CHACHA20-POLY1305:ECDHE-RSA-CHACHA20-POLY1305:DHE-RSA-AES128-GCM-SHA256:DHE-RSA-AES256-GCM-SHA384;
  ssl_prefer_server_ciphers off;

  server_name           minio.example.com;

  client_max_body_size 2G;

  location / {
    proxy_redirect off;
    proxy_pass http://127.0.0.1:9000;
    proxy_http_version 1.1;
    proxy_set_header Upgrade $http_upgrade;
    proxy_set_header Connection "upgrade";
    proxy_set_header Host $host;
    proxy_set_header X-Real-IP $remote_addr;
    proxy_set_header X-Forwarded-For $proxy_add_x_forwarded_for;
    chunked_transfer_encoding off;
  }
}
Edit minioconsole.conf
nano /etc/nginx/conf.d/minioconsole.conf
server {
  listen 127.0.0.1:30002 ssl http2;

  ssl_certificate       /your/path/fullchain.pem;
  ssl_certificate_key   /your/path/privkey.pem;
  ssl_session_timeout 1d;
  ssl_session_cache shared:MozSSL:10m;
  ssl_session_tickets off;

  ssl_protocols         TLSv1.2 TLSv1.3;
  ssl_ciphers           ECDHE-ECDSA-AES128-GCM-SHA256:ECDHE-RSA-AES128-GCM-SHA256:ECDHE-ECDSA-AES256-GCM-SHA384:ECDHE-RSA-AES256-GCM-SHA384:ECDHE-ECDSA-CHACHA20-POLY1305:ECDHE-RSA-CHACHA20-POLY1305:DHE-RSA-AES128-GCM-SHA256:DHE-RSA-AES256-GCM-SHA384;
  ssl_prefer_server_ciphers off;

  server_name           minioconsole.example.com;

  client_max_body_size 2G;

  location / {
    proxy_redirect off;
    proxy_pass http://127.0.0.1:9090;
    proxy_http_version 1.1;
    proxy_set_header Upgrade $http_upgrade;
    proxy_set_header Connection "upgrade";
    proxy_set_header Host $host;
    proxy_set_header X-Real-IP $remote_addr;
    proxy_set_header X-Forwarded-For $proxy_add_x_forwarded_for;
    chunked_transfer_encoding off;
  }
}
Edit testbucket.conf
nano /etc/nginx/conf.d/testbucket.conf
server {
  listen 127.0.0.1:30003 ssl http2;

  ssl_certificate       /your/path/fullchain.pem;
  ssl_certificate_key   /your/path/privkey.pem;
  ssl_session_timeout 1d;
  ssl_session_cache shared:MozSSL:10m;
  ssl_session_tickets off;

  ssl_protocols         TLSv1.2 TLSv1.3;
  ssl_ciphers           ECDHE-ECDSA-AES128-GCM-SHA256:ECDHE-RSA-AES128-GCM-SHA256:ECDHE-ECDSA-AES256-GCM-SHA384:ECDHE-RSA-AES256-GCM-SHA384:ECDHE-ECDSA-CHACHA20-POLY1305:ECDHE-RSA-CHACHA20-POLY1305:DHE-RSA-AES128-GCM-SHA256:DHE-RSA-AES256-GCM-SHA384;
  ssl_prefer_server_ciphers off;

  server_name           testbucket.minio.example.com;

  client_max_body_size 2G;

  location / {
    proxy_redirect off;
    proxy_pass http://127.0.0.1:9000;
    proxy_http_version 1.1;
    proxy_set_header Host $host;
    proxy_set_header X-Real-IP $remote_addr;
    proxy_set_header X-Forwarded-For $proxy_add_x_forwarded_for;
    proxy_set_header X-Forwarded-Proto $scheme;
    proxy_connect_timeout 300;
    proxy_set_header Connection "";
    chunked_transfer_encoding off;
  }
}
Edit httpsredirect.conf
nano /etc/nginx/conf.d/httpsredirect.conf
server {
        listen 80;
        server_name minio.example.com;
        if ($host = minio.example.com) {
                return 301 https://$host$request_uri;
        }
        server_name minioconsole.example.com;
        if ($host = minioconsole.example.com) {
                return 301 https://$host$request_uri;
        }
        server_name testbucket.minio.example.com;
        if ($host = testbucket.minio.example.com) {
                return 301 https://$host$request_uri;
        }
}
Check Nginx syntax
nginx -t
Start Nginx service
systemctl restart nginx
systemctl enable nginx
4. MinIO Configuration
- Go to MinIO console https://minioconsole.example.com. Use MINIO_ROOT_USER, MINIO_ROOT_PASSWORD to log in your account.
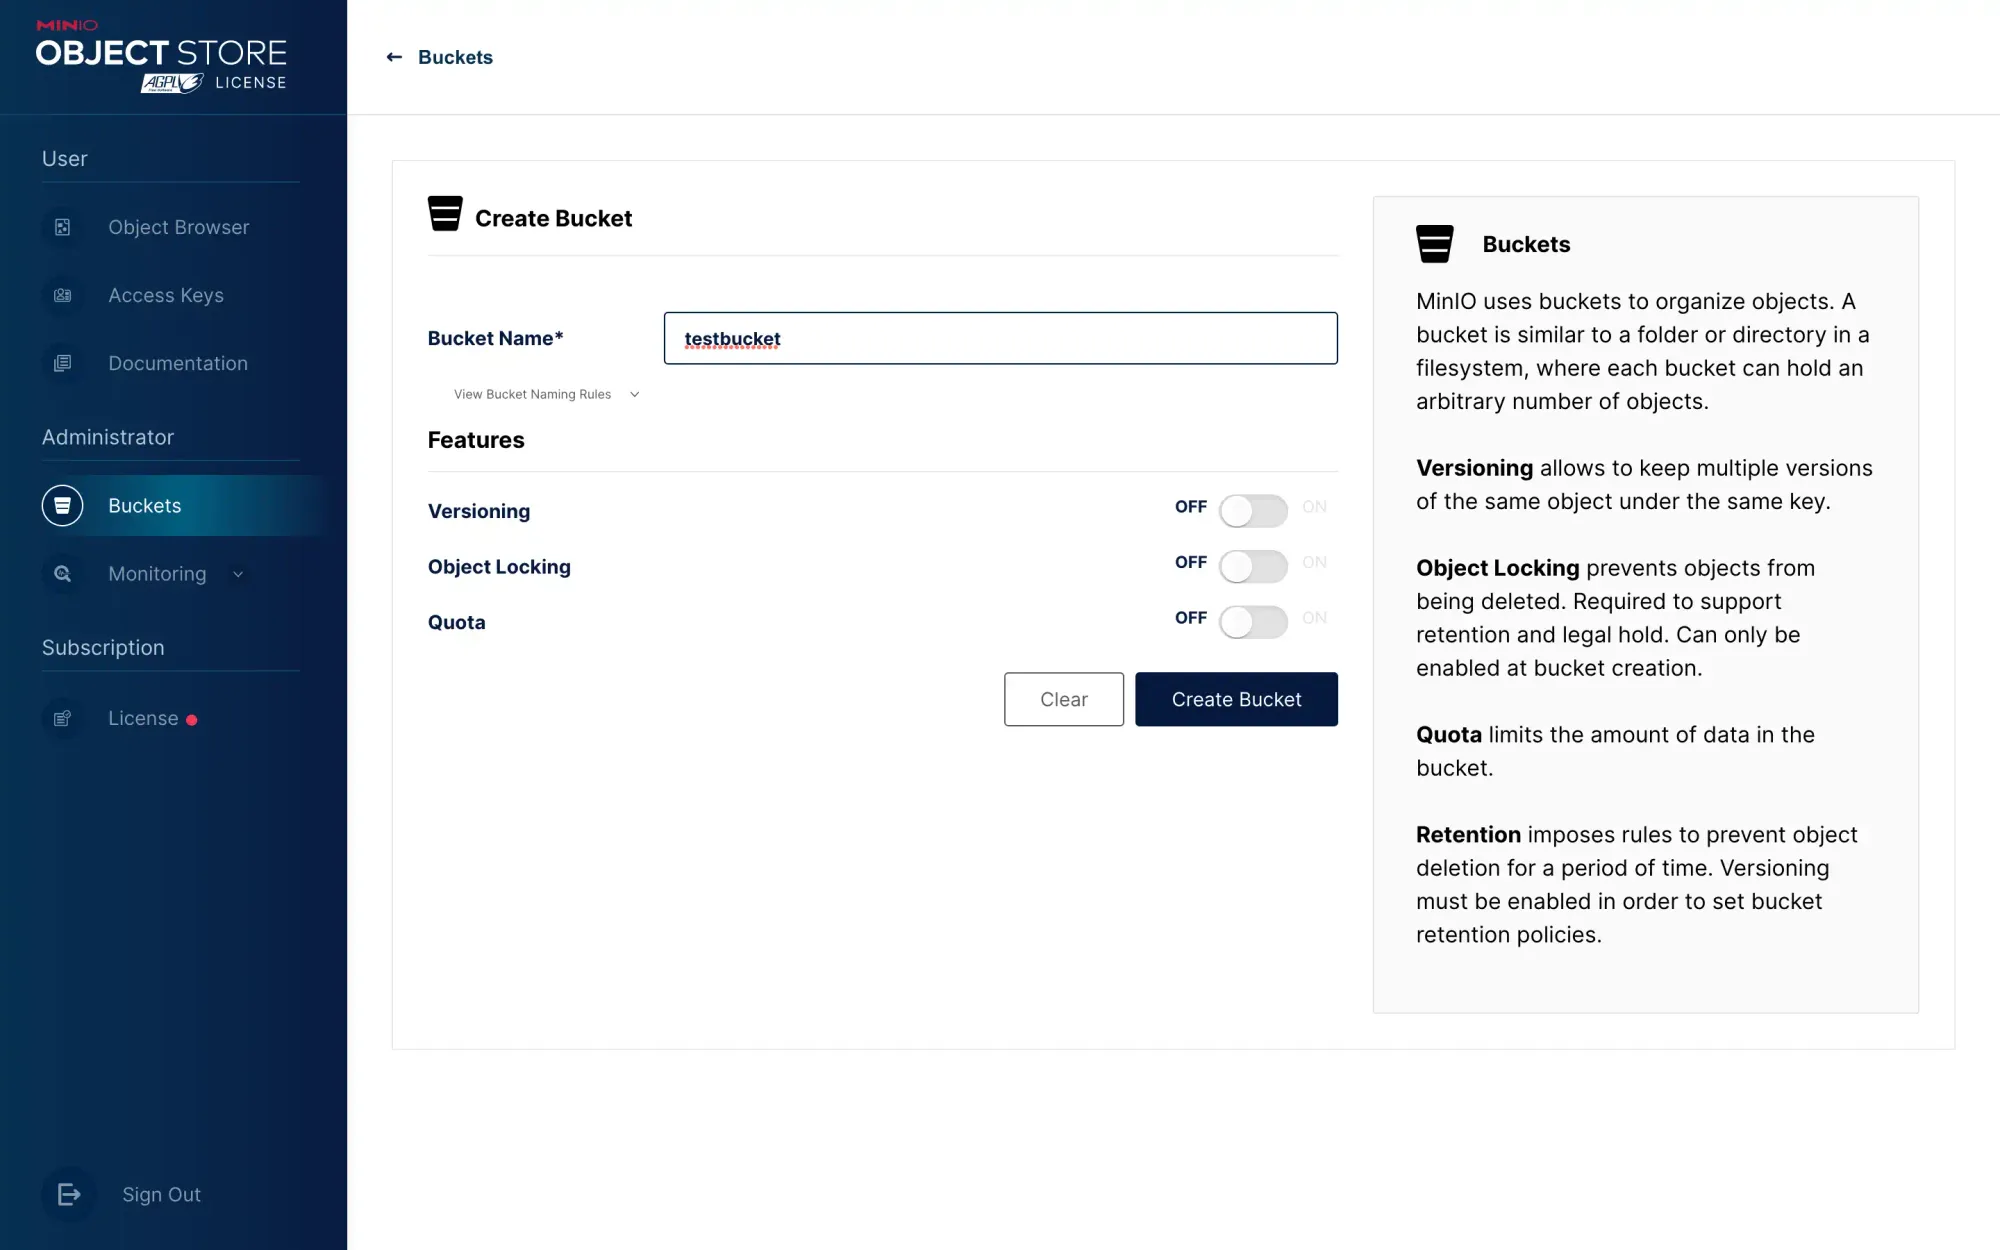
- Create a bucket, assuming you set the bucket name to
testbucket: (the bucket name has to match the Nginx settingtestbucket.minio.example.com)
- Test your DNS bucket, visit the domain name testbucket.minio.example.com. If it is normal, you should be able to see something similar to the following:
This XML file does not appear to have any style information associated with it. The document tree is shown below.
<Error>
<Code>AccessDenied</Code>
<Message>Access Denied.</Message>
<BucketName>testbucket</BucketName>
<Resource>/</Resource>
<RequestId>1751234A77758B5E</RequestId>
<HostId>e3b0c12347fc1c149afbf4c8856fb92427be41e4649b934ca495291a7852b855</HostId>
</Error>
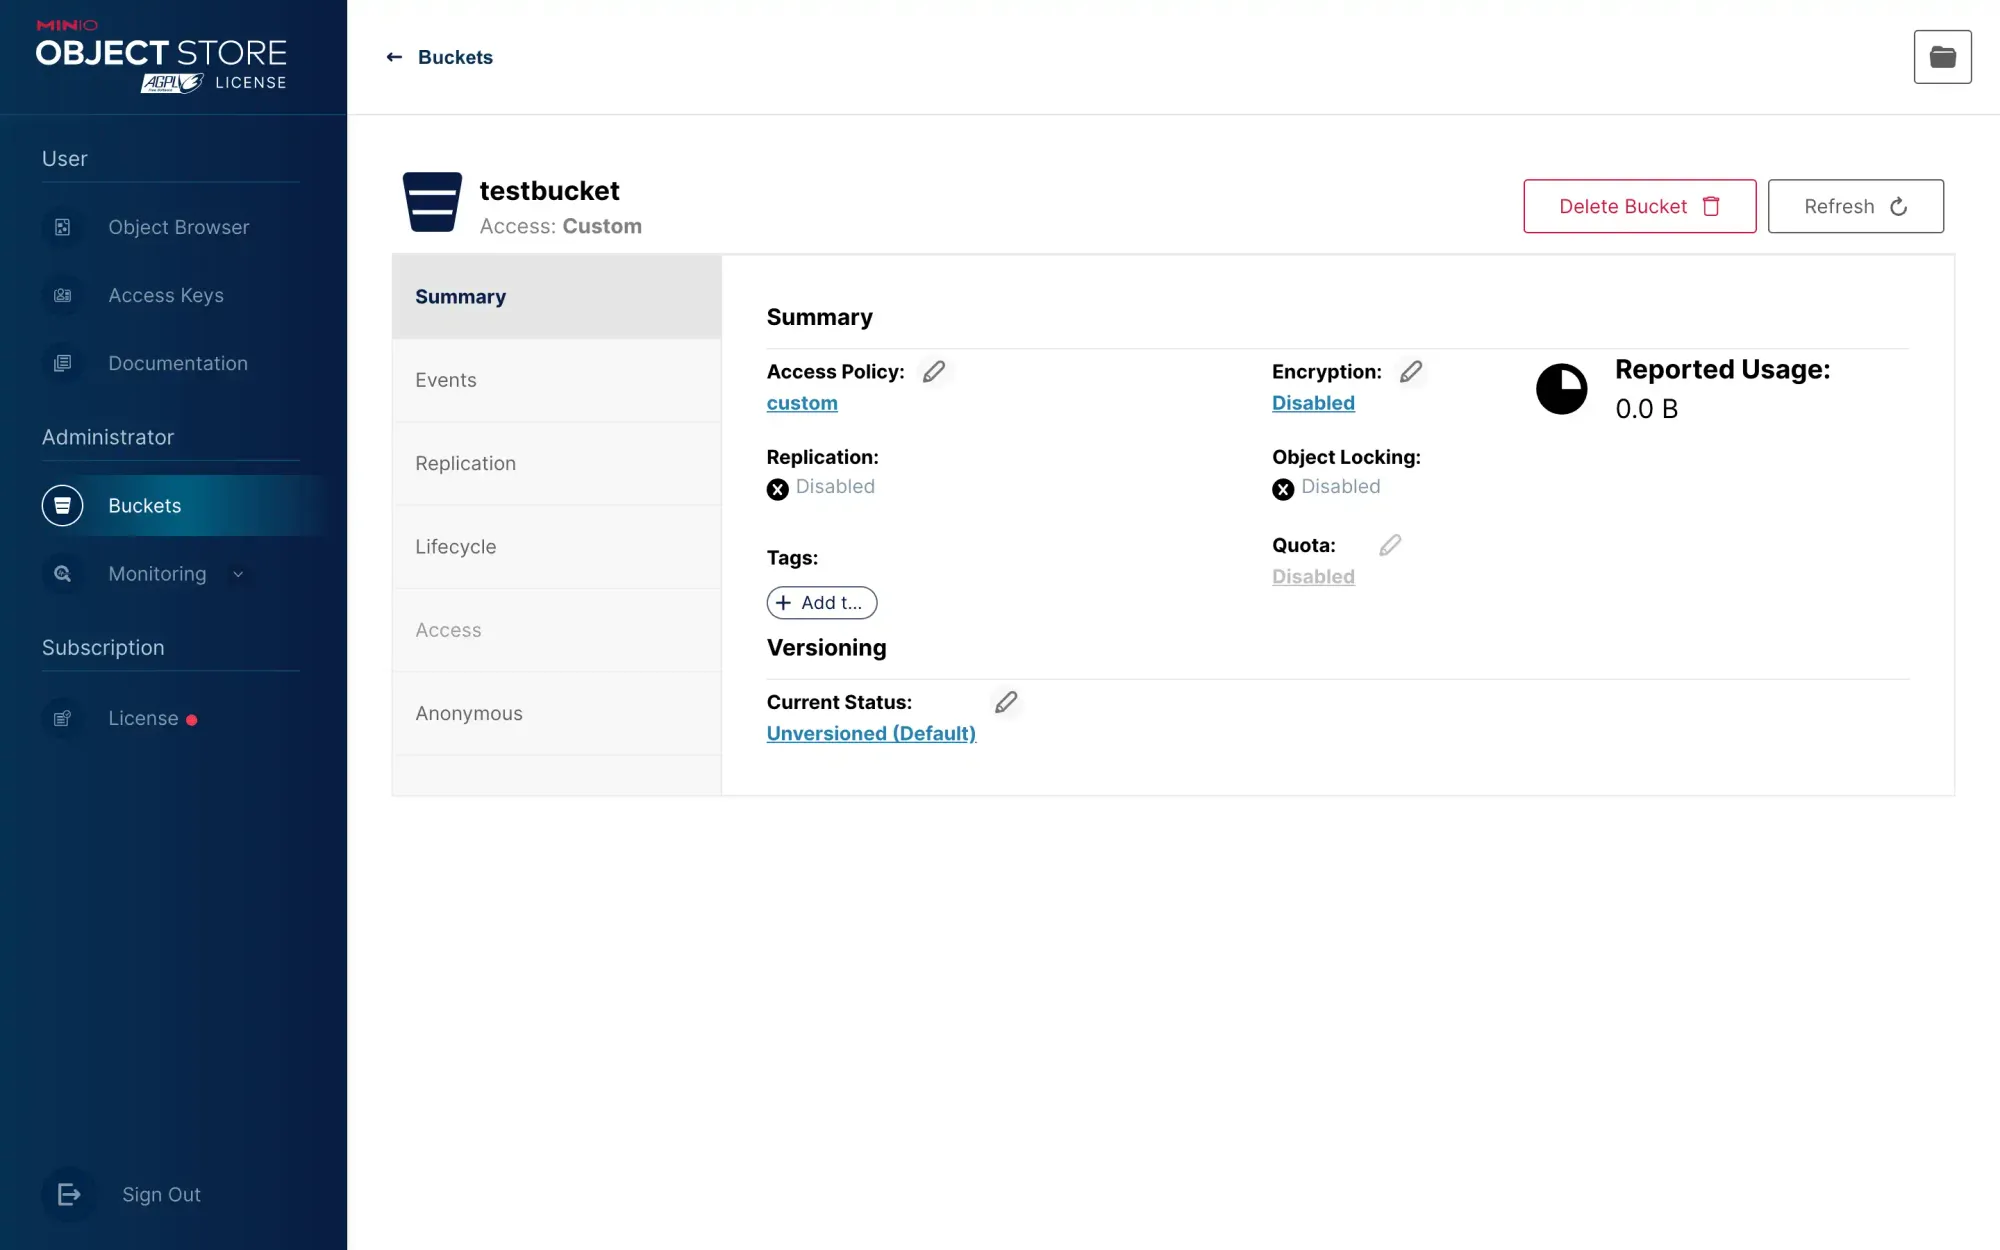
- If you want this bucket to provide services externally, you first need to change the anonymous access permission of this bucket to read-only:
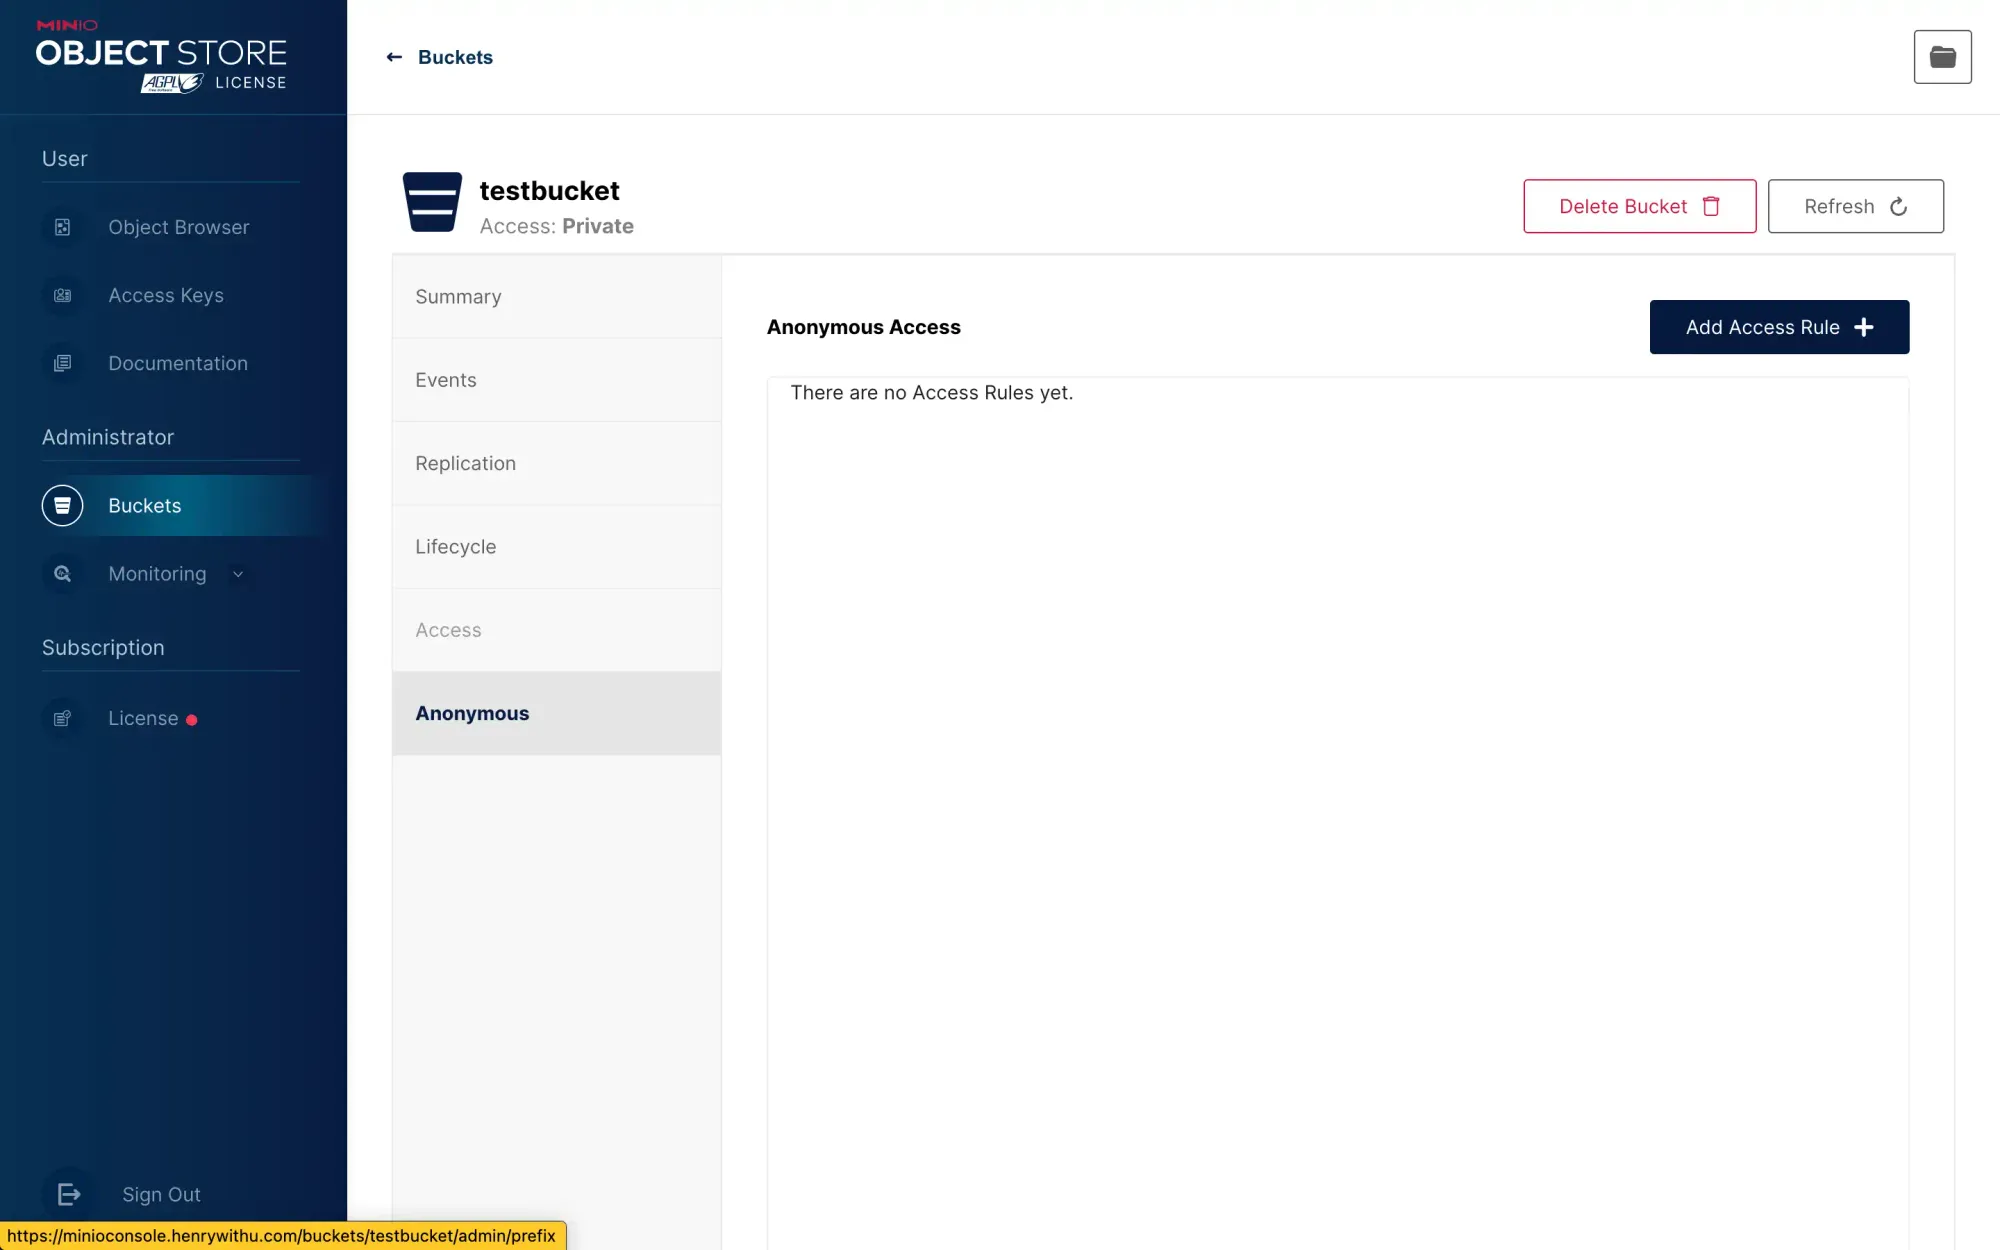
Enter a / in the prefix to indicate that all paths under the bucket are read-only:
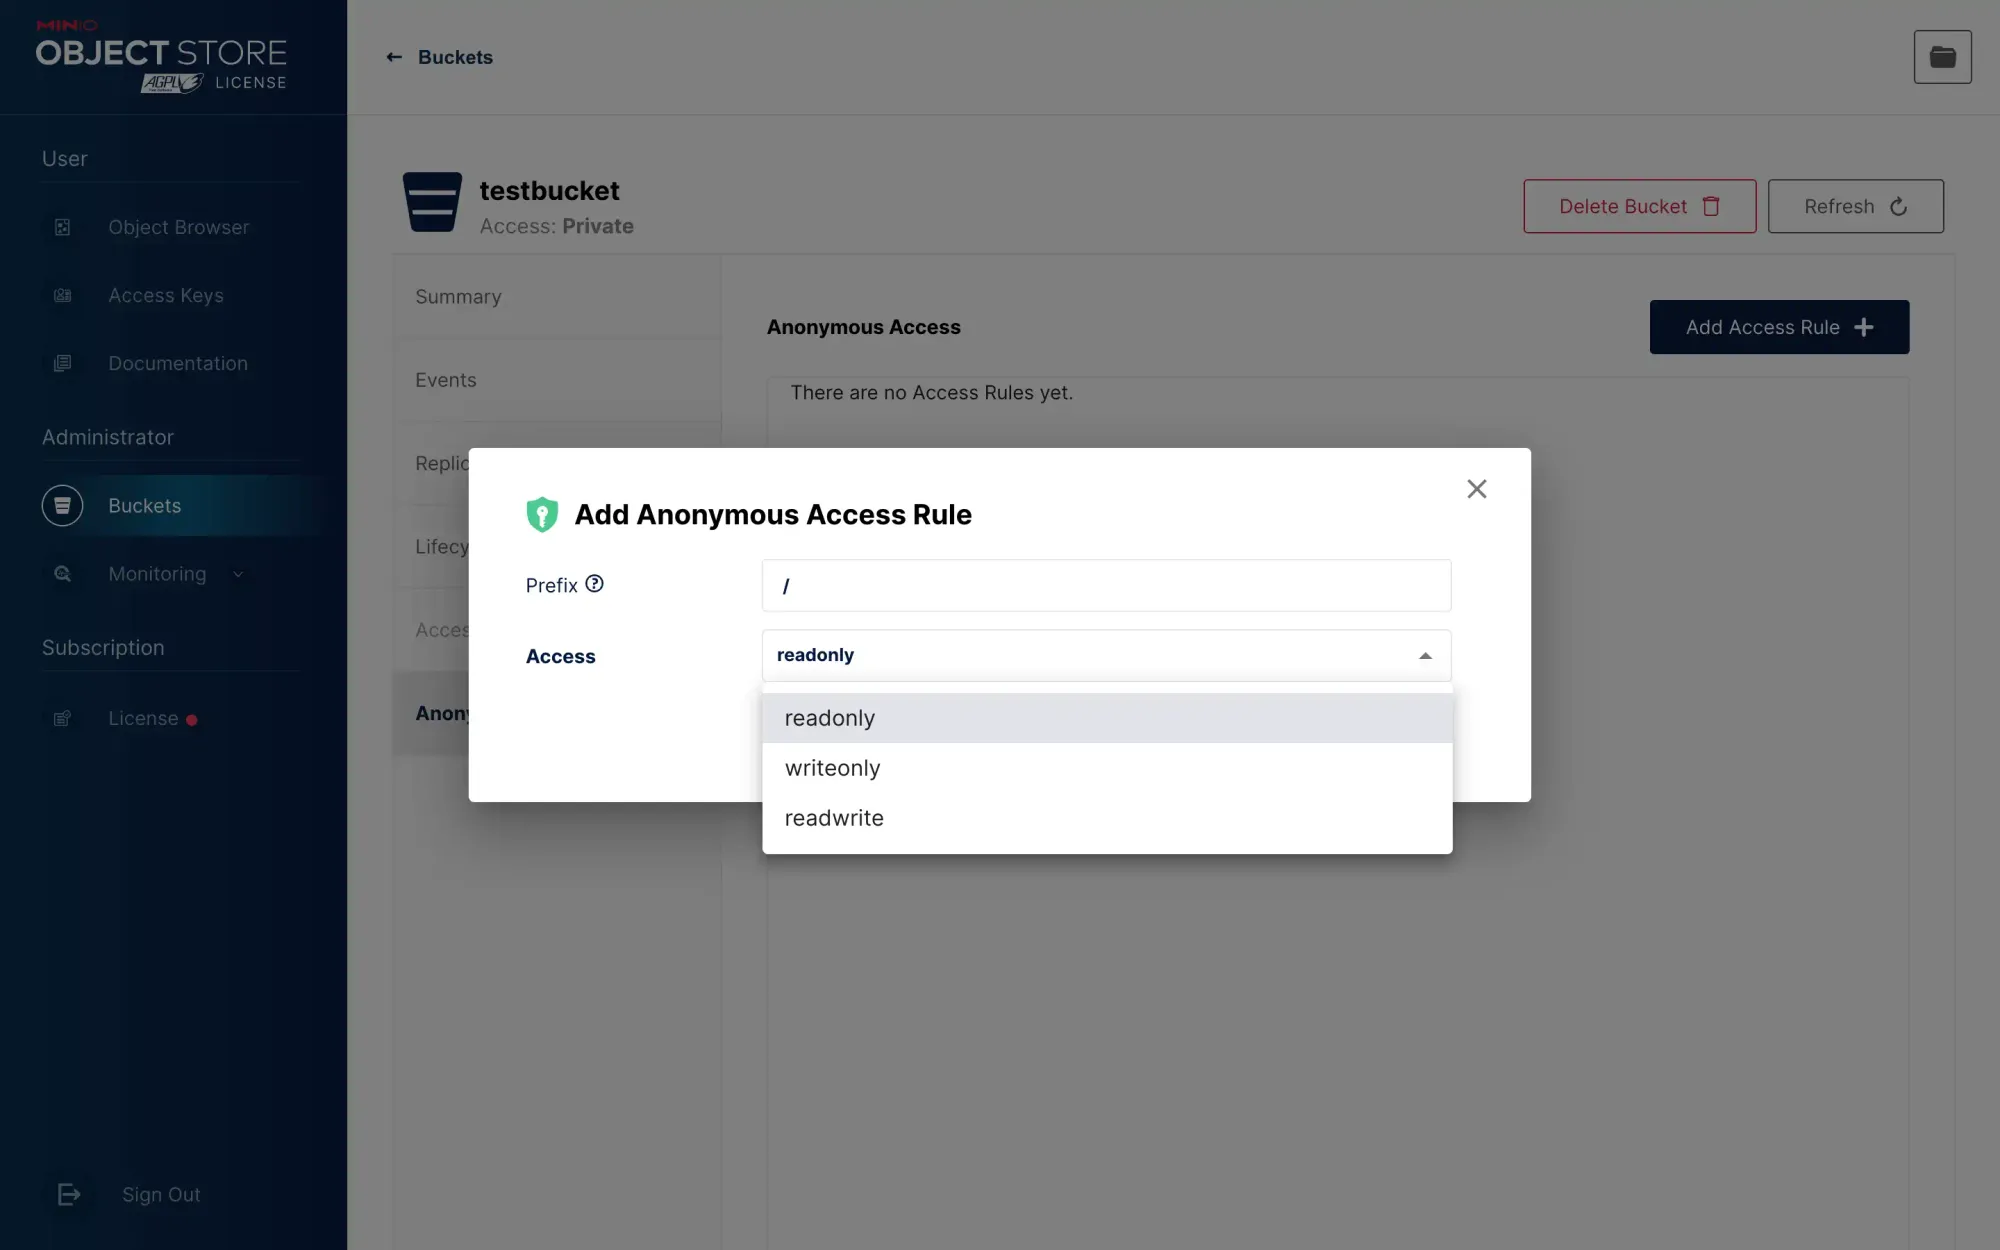
Note that the write permission must not be given here. Giving the write permission means that anyone can upload files to this bucket.
Then there is another problem now. Although it is now read-only, when a user directly accesses your bucket domain name (testbucket.minio.example.com), all directories and file names under your bucket will be directly exposed.
We can hide the directory by configuring specific policies. After you set the anonymous access permission to read-only, refresh the page and see that this place will be displayed as custom:
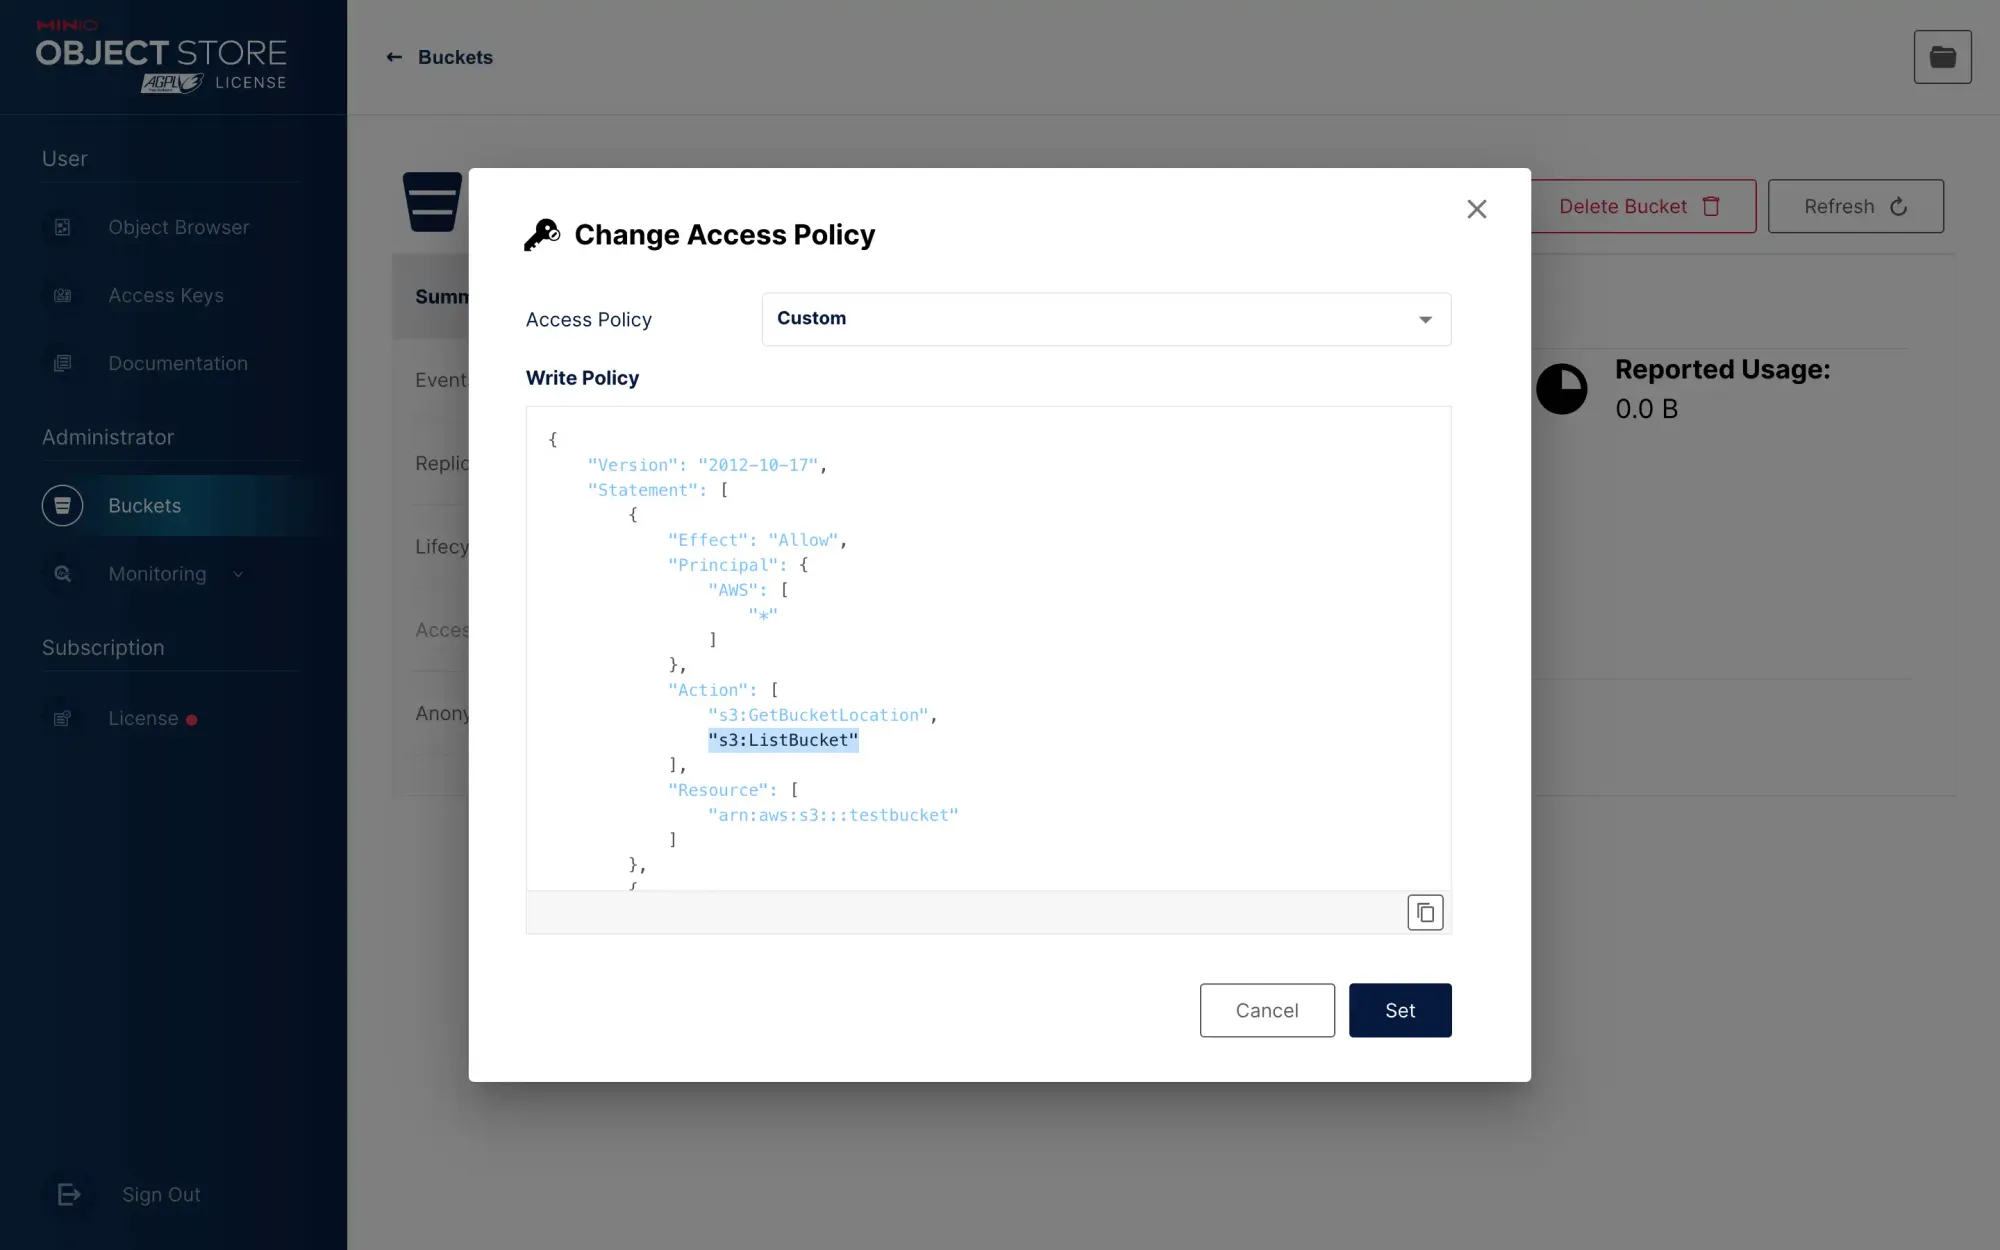
Edit this policy and see that the default configuration inside is:
{
    "Version": "2012-10-17",
    "Statement": [
        {
            "Effect": "Allow",
            "Principal": {
                "AWS": [
                    "*"
                ]
            },
            "Action": [
                "s3:GetBucketLocation",
                "s3:ListBucket"
            ],
            "Resource": [
                "arn:aws:s3:::testbucket"
            ]
        },
        {
            "Effect": "Allow",
            "Principal": {
                "AWS": [
                    "*"
                ]
            },
            "Action": [
                "s3:GetObject"
            ],
            "Resource": [
                "arn:aws:s3:::testbucket/*"
            ]
        }
    ]
}
Just delete s3:ListBucket to close the list directory. Pay attention to the syntax, delete s3:ListBucket and also need to remove the comma above s3:GetBucketLocation.
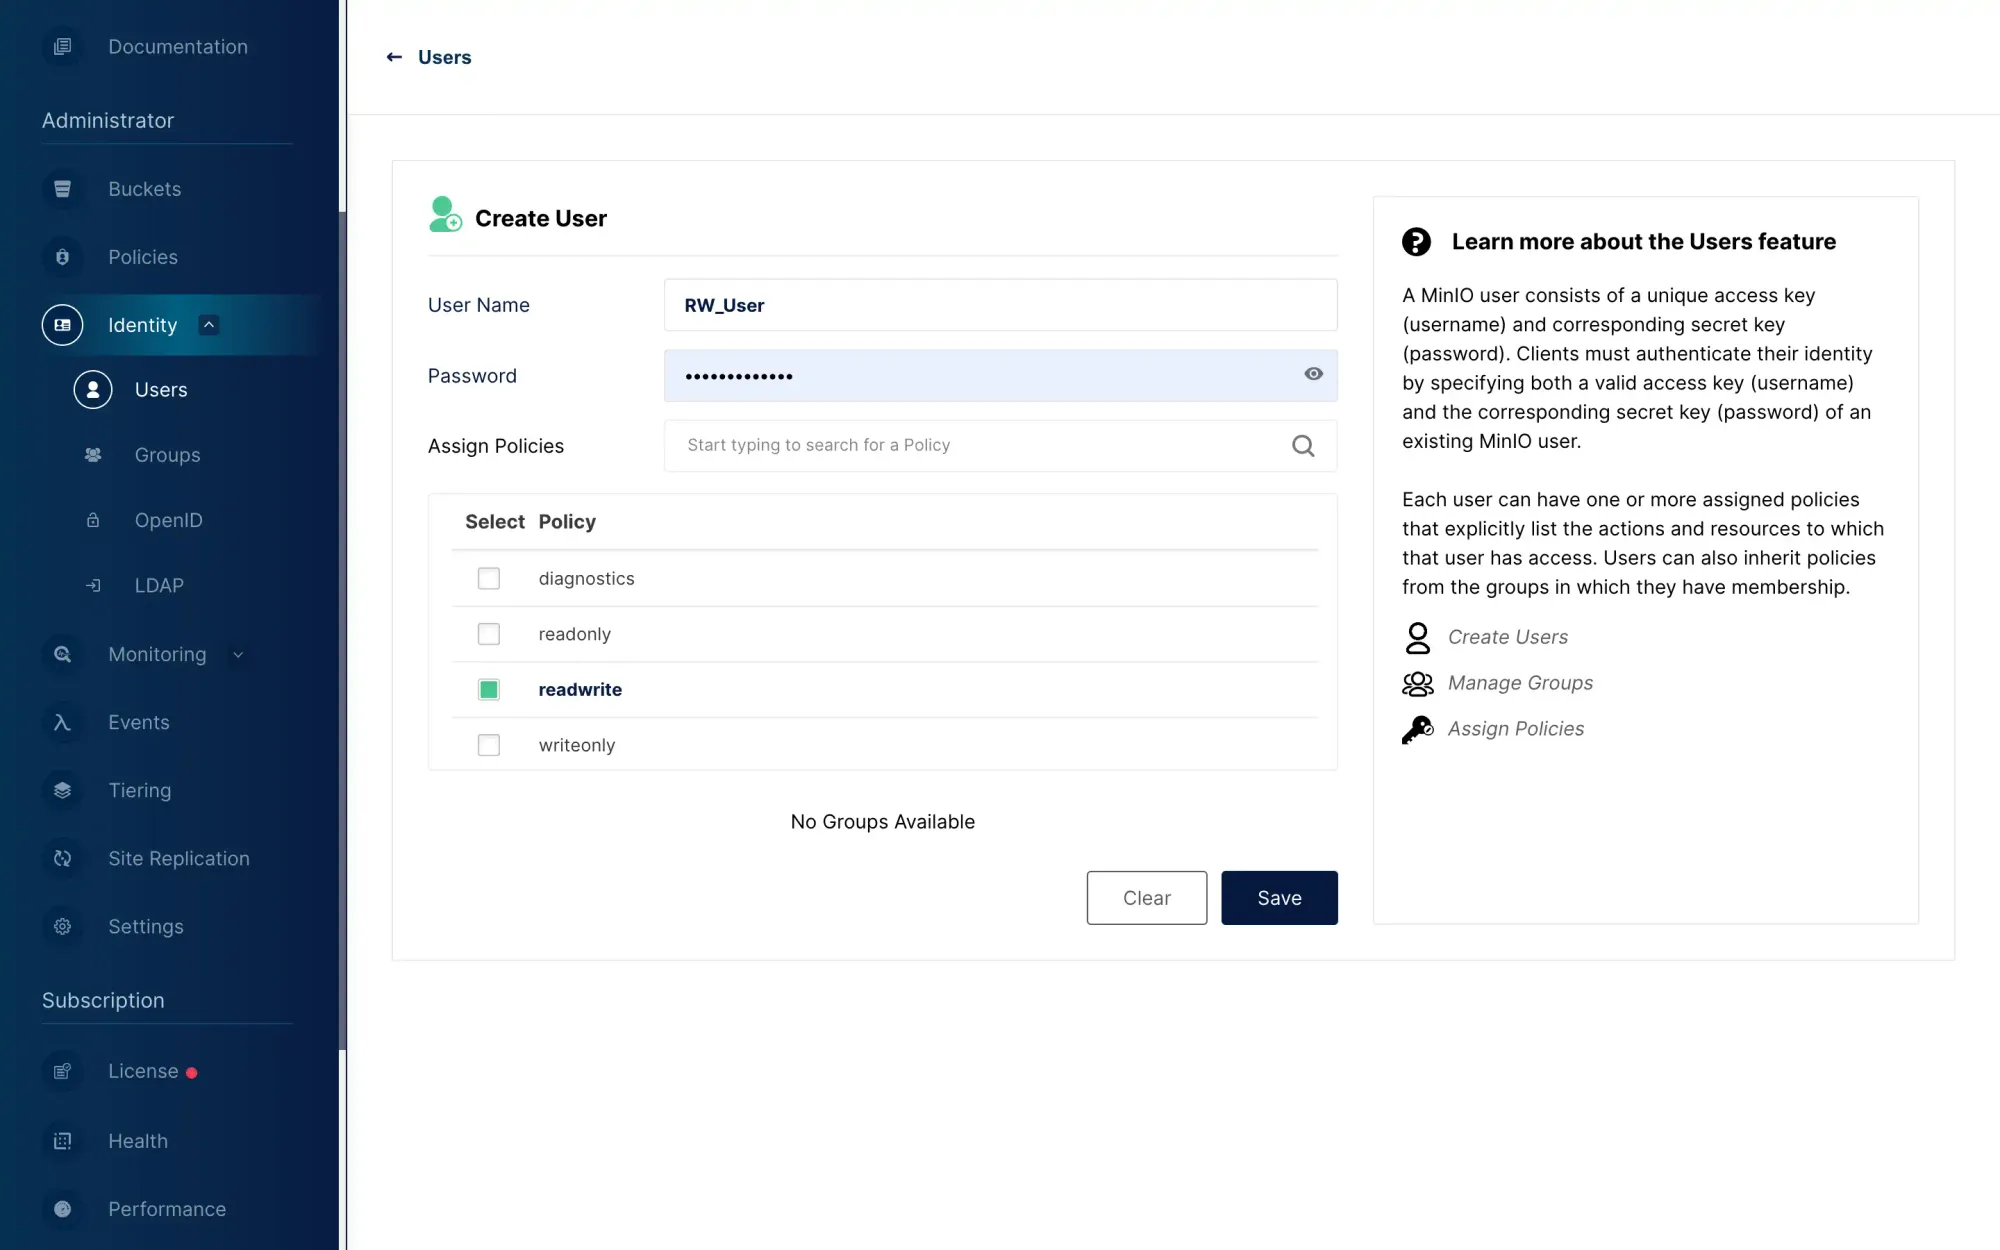
At the same time, for the sake of safety, you should create a new ordinary user in the console, and this user can be given a read and write permission:
Log in to the console as an ordinary user, and create Access Key and Secret Key under this ordinary user:
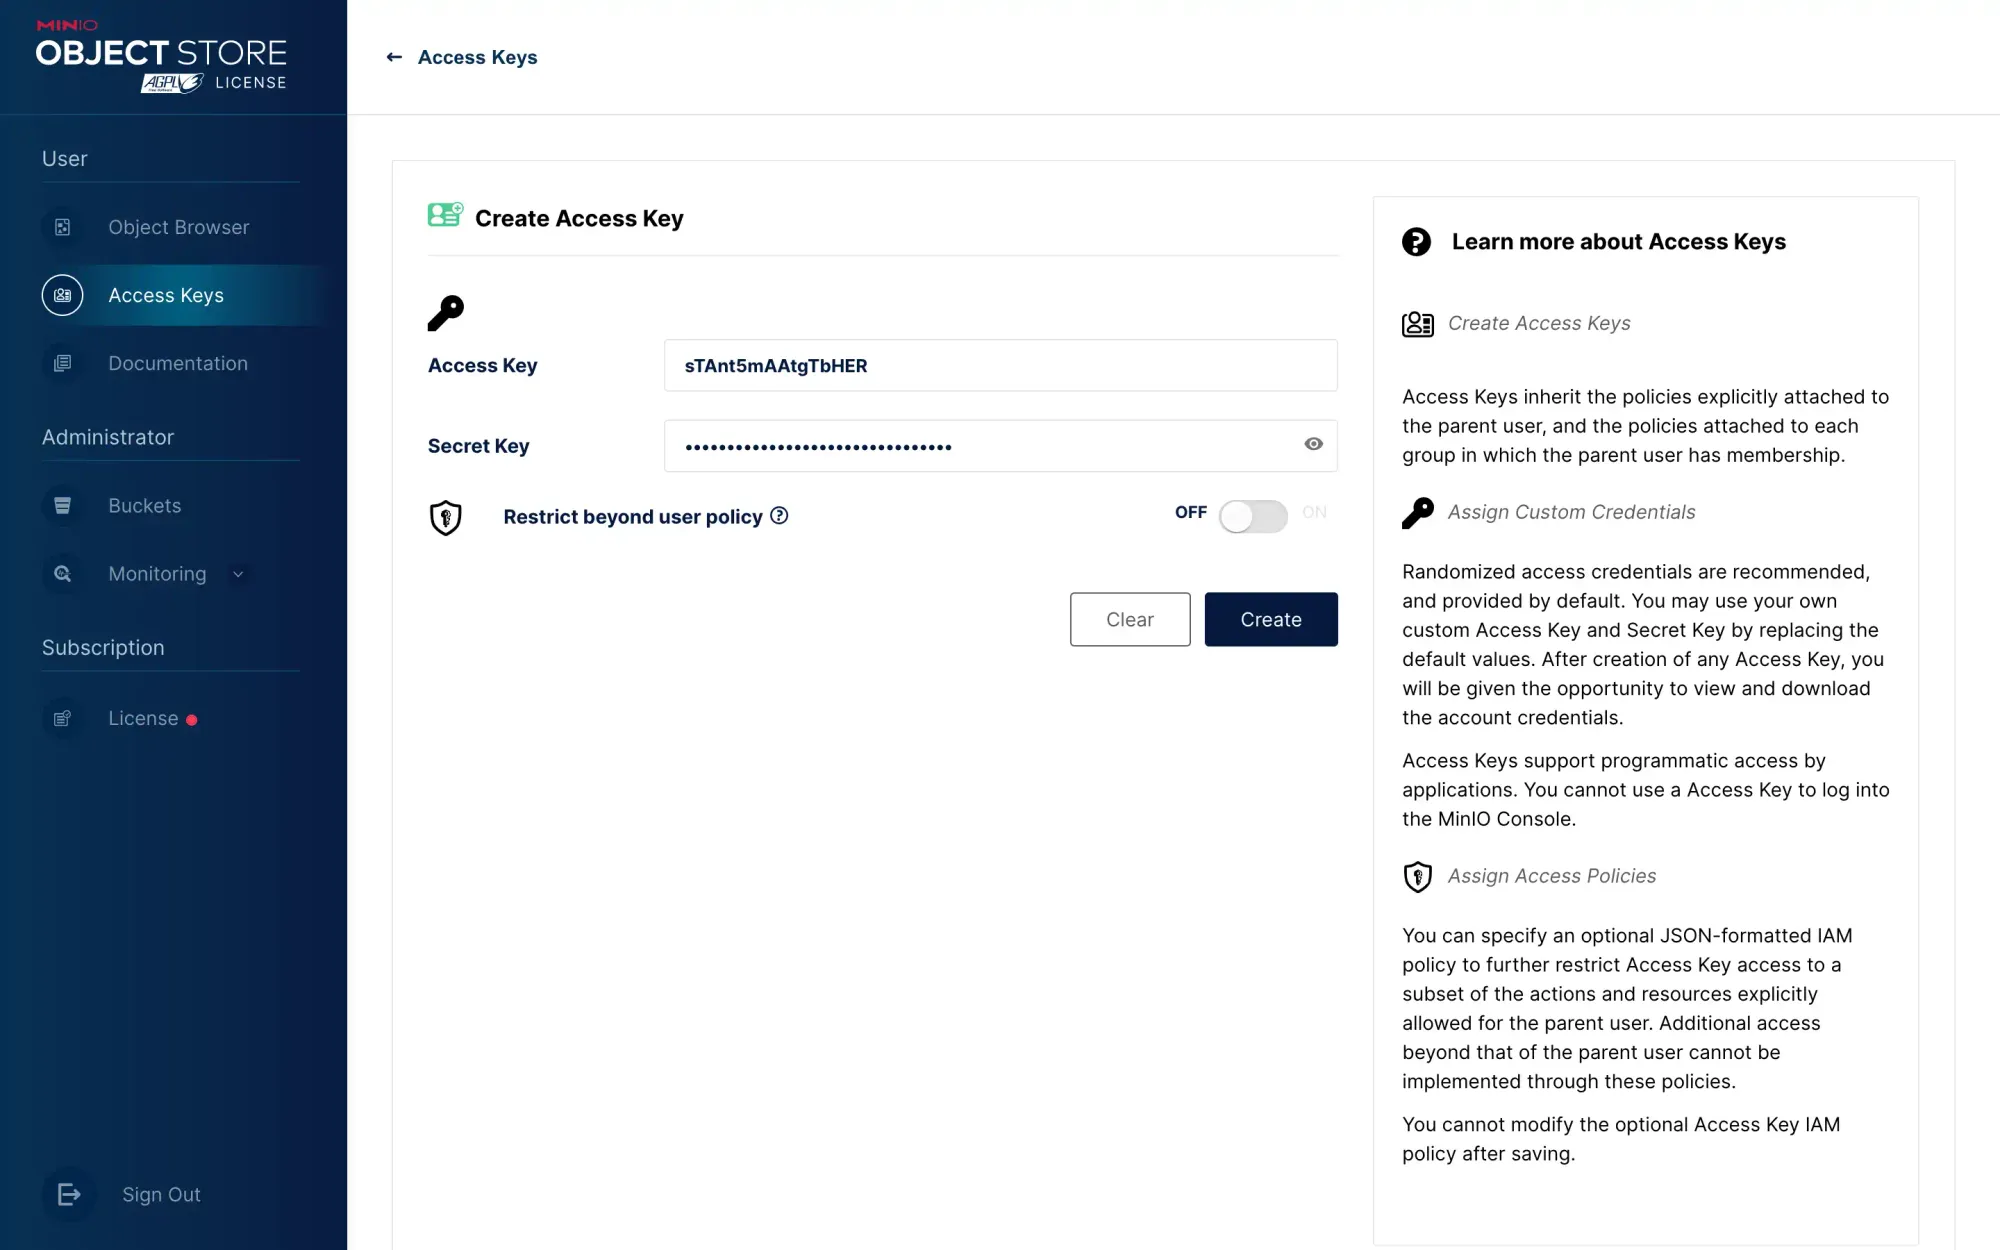
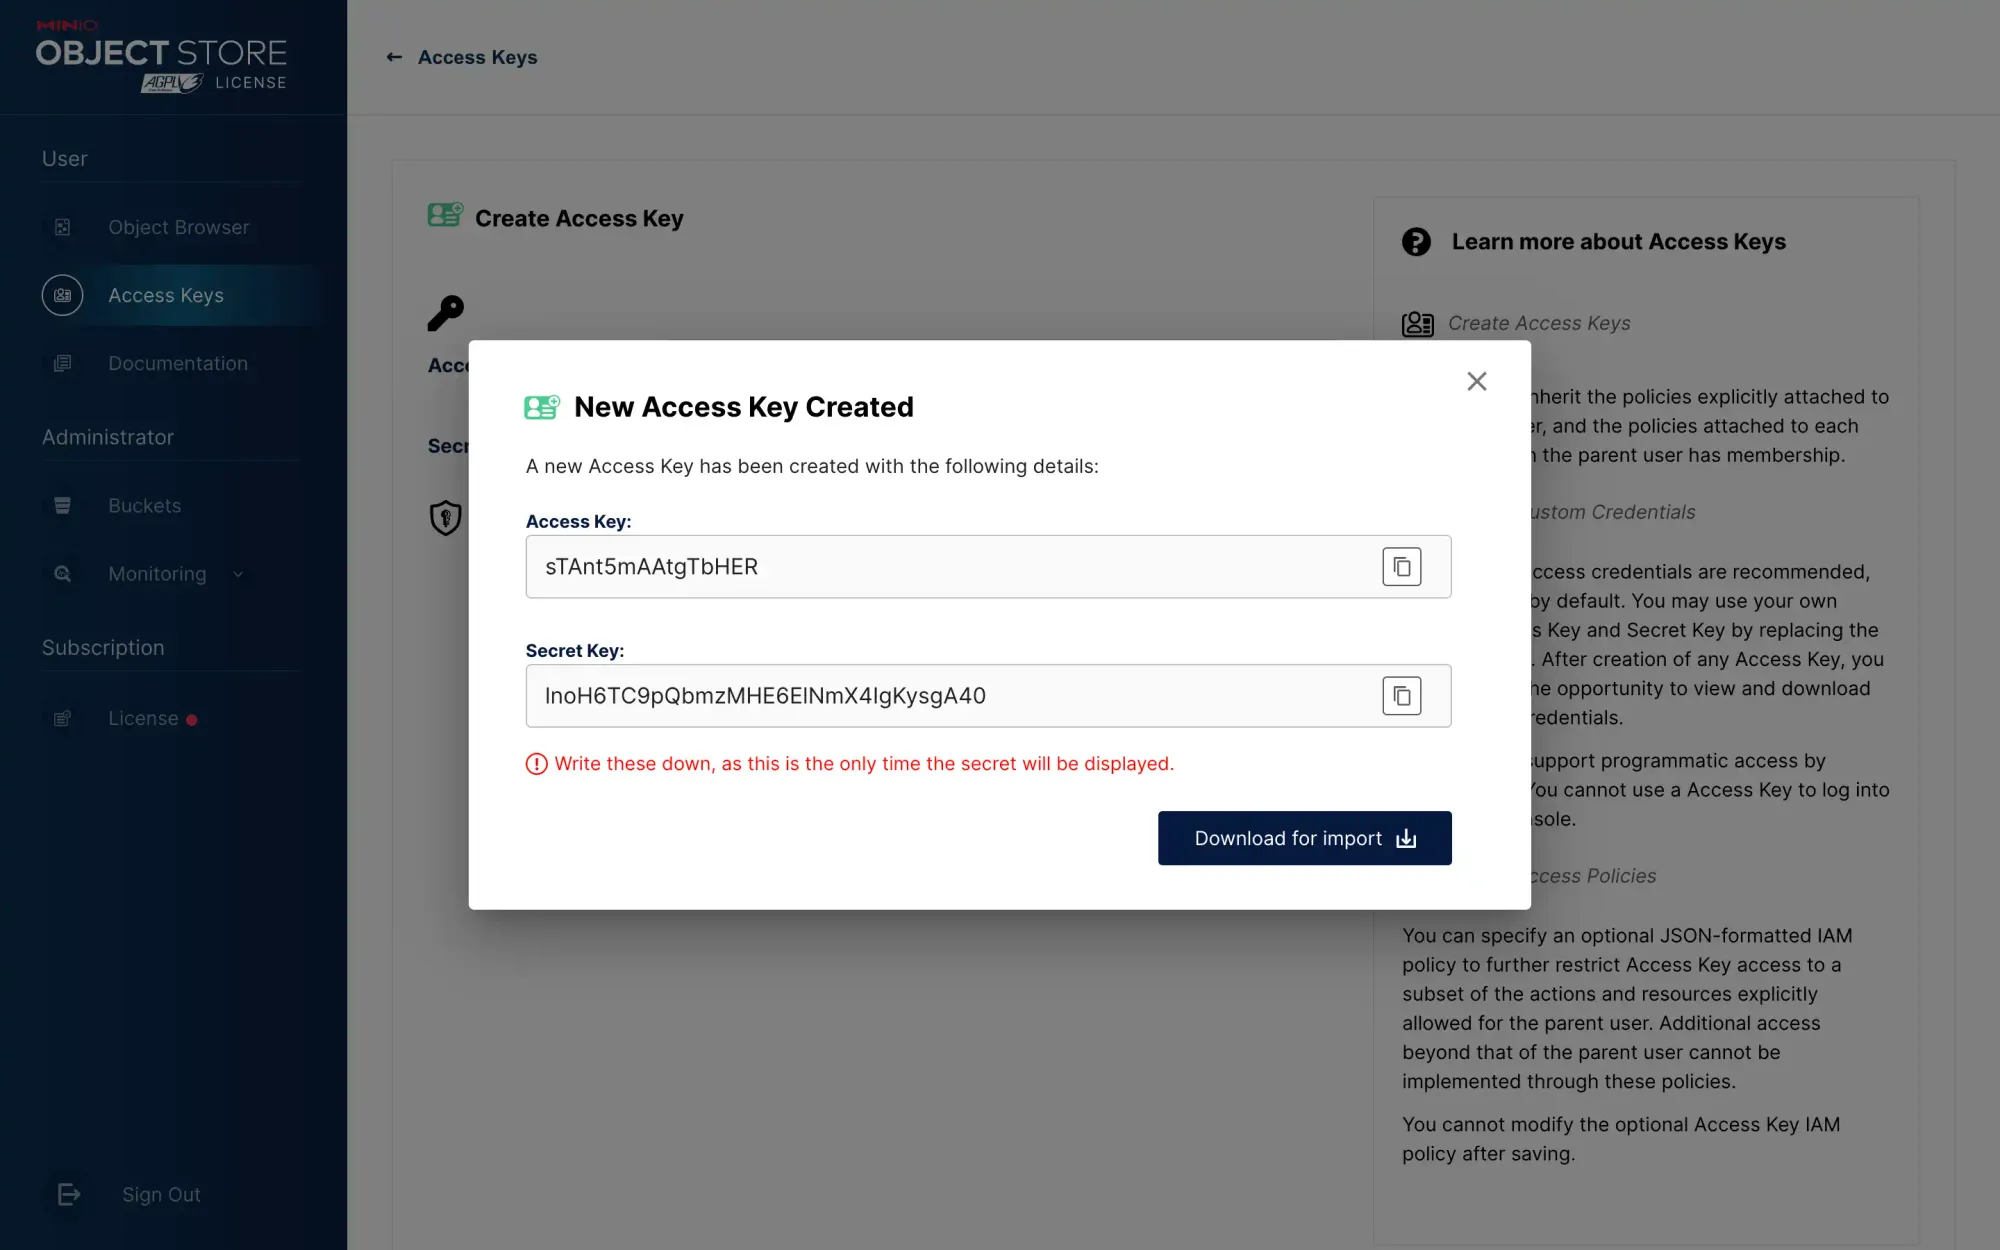
When configuring other services to use the bucket, always use the Access Key and Secret Key under ordinary users.
5. Further Integration
I will introduce the MinIO integration with other applications in future articles.
One example is PeerTube Integration with MinIO Object Storage
Copyright statement: Unless otherwise stated, all articles on this blog adopt the CC BY-NC-SA 4.0 license agreement. For non-commercial reprints and citations, please indicate the author: Henry, and original article URL. For commercial reprints, please contact the author for authorization.