Train Your Own Voice Model and Make Voice Clones - RVC Web-UI Comprehensive Guide
comprehensive, step-by-step walkthrough on training your initial cloned voice model and employing AI to convert one voice into another effortlessly


 Henry
Henry
Update 20240102: RVC WebUI v2 with RMVPE Colab Notebook:
HenryBackground
Do you aspire to create AI-generated song covers effortlessly? Are you interested in replicating a voice and seamlessly applying it to either a speech or a song to achieve a remarkably realistic result? Look no further than the Retrieval-based Voice Conversion WebUI by RVC-Project. In this beginner's guide, you'll receive a comprehensive, step-by-step walkthrough on training your initial cloned voice model and employing AI to convert one voice into another effortlessly. Ready to embark on this tutorial? Let's get started!
RVC Web-UI GitHub Repo
This guide comprises three primary sections:
-
Installation of the RVC WebUI: In this part, you will learn how to set up the RVC WebUI.
-
Voice Model Training (Voice Cloning): The second section focuses on the process of training a voice model, which essentially involves cloning a voice.
-
Model Inference (Voice Conversion): The third section delves into model inference, demonstrating how to convert one voice into another.
How to Begin Voice Cloning: What You'll Need
To embark on your journey into voice cloning, you'll want to utilize the impressive Retrieval-based Voice Conversion WebUI, a tool provided by the RVC-Project, which will be the focus of this tutorial. This software is generously accessible under the MIT software license, available for download from either their official GitHub repository or via the Huggingface repository.
In addition to securing the RVC WebUI on your system, it's imperative to have samples of the voice you intend to clone. This guide will take you through the crucial steps for formatting the recorded voice audio files to kickstart the training process and provide insights into installing the RVC WebUI on your system.
How Much Voice Audio Do You Need for Voice Training or Cloning?
When using the RVC WebUI for voice training or cloning, the ideal audio dataset typically ranges from 10 minutes to 1 hour of high-quality, clear voice recordings. Smaller datasets may produce less satisfactory results, so it's advisable to aim for this time frame.
It's worth noting that you can experiment with datasets that are shorter or longer than the recommended range, but be cautious, as excessive data might not significantly improve the results. There's no one-size-fits-all approach; feel free to explore and adjust as needed.
For effective voice training, ensure that the vocal samples used are free from any reverb, delay, or echo effects. Such effects can hinder the accuracy of your chosen voice's training process.
In my own experience, I successfully trained my first model using approximately 30 minutes of high-quality isolated vocals, resulting in commendable outcomes.
If you're wondering where to source clean and high-quality vocals for testing the voice cloning capabilities of the RVC WebUI, I have a solution for you.
In general, one of the most valuable sources for such data is collections of game character voice lines from various video games, which are widely available on the internet. These can be exceptionally useful if you either prefer not to or cannot record your own vocal samples for experimentation.
In the following paragraph, I will outline the types of recordings suitable for efficient voice training using RVC and those that are not recommended.
How to Prepare the Vocal Training Dataset
When preparing your vocal training dataset for use with RVC WebUI, it's essential to follow these guidelines:
-
File Format and Submission:
- Submit your audio files in .wav or .mp3 format.
- Provide the file path to your selected audio file within the WebUI.
-
Quality Standards:
- Ensure that the audio files you supply are of high quality.
- The recordings should feature clear and uninterrupted vocal content, such as singing or speech.
- Avoid any instrumental elements, background noise, or excessive audio effects in the recordings.
-
Splitting Long Audio Files:
- There's no need to manually split long audio files before training.
- The RVC WebUI automatically segments long audio files into 4-second samples during processing.
-
Preprocessing Considerations:
- Eliminate any reverb, delay, or echo effects applied to the voice you want to clone.
- Remove any background noise from the training audio, as this is crucial.
- Cut out extended silent portions from the training audio (typically one to two seconds of silence between voice lines is acceptable).
-
Acapella Vocals:
- For acapella vocals taken from songs, solo vocals work best.
- Avoid using harmonized vocals or audio featuring multiple recorded voices simultaneously, as this may lower the quality of the training model.
-
Quality Over Quantity:
- Emphasize the quality of your chosen voice samples over their quantity.
- A 15-minute vocal recording of high quality is preferable to a lengthy, low-quality voice audio file.
By adhering to these guidelines, you can ensure the best results, provided you also configure the remaining settings correctly. Now, let's proceed to the actual training process.
How to Quickly Install the RVC WebUI
To install the Retrieval-based Voice Conversion (RVC) WebUI swiftly, follow these steps. Please note that Python must be installed on your system, with a recommended version of 3.8 or higher. Additionally, if you're using Windows, ensure that ffmpeg is installed.
Keep in mind that while the RVC WebUI is known to work well on Windows and Linux, its compatibility with MacOS might require additional adjustments.
Method 1: For GitHub Users
-
Clone the RVC WebUI files from the official GitHub repository to your system. Install the necessary dependencies using the provided
requirements.txtfile and run the software usinggo-web.bat.Open a system terminal with administrator privileges in the desired installation location and execute the following commands:
git clone https://github.com/RVC-Project/Retrieval-based-Voice-Conversion-WebUI/ pip install -r requirements.txt -
After successful installation of the dependencies, download the required models for RVC WebUI, which are crucial for training and voice conversion. You can obtain these files from the RVC WebUI GitHub repository here. You'll need the following files:
hubert_base.pt,pretrained,uvr5_weights, andpretrained_v2. -
Move the downloaded model files to the directory where you cloned the RVC WebUI files.
-
To launch the WebUI, on Windows, double-click
go-web.bat, and on Linux, execute theinfer-web.pyscript.
Easier & Faster Method: Non-GitHub Users
-
Download the
RVC-xxx.7zfile from the RVC WebUI GitHub repository. This approximately 5GB archive contains all the necessary files, including the required model files.
Note: xxx represents a version based on your hardware. -
Extract the contents of the
RVC-xxx.7zfile to a directory of your choice. -
Open a system terminal with administrator privileges in the directory where you extracted the
RVC-xxx.7zfile. Install the required dependencies by running the following command:pip install -r requirements.txt -
To launch the WebUI, use
go-web.baton Windows andinfer-web.pyon Linux.
If you encounter any difficulties during the installation process, refer to the official installation guide in the RVC repository here.
How to Train a Voice Model Using the RVC WebUI: A 3-Step Guide
I will walk you through the process of training a voice model using the RVC WebUI. By following these three straightforward steps, you can create and train a model based on your chosen acapella vocal recordings.

Step 1: Configure Initial Settings
-
Begin by selecting a name for your model in the "Enter the experiment name" field located at the top left corner of the main RVC WebUI screen.
-
Configure the following settings as recommended for a solid starting point:
- Target sample rate: 40k
- Pitch guidance: True
- Model architecture: v2
- Threads for CPU: Adjust to the maximum your system can handle (lower it if you encounter initial processing issues).
Step 2: Load and Process Training Audio Data
-
In the "Enter the path of the training folder" field, input the path to the directory containing the voice audio samples you intend to use for training. This directory should exclusively contain the audio files you want for your model, whether they are multiple audio files or a single, extended audio file.
-
To quickly acquire the current directory path in the default Windows system file browser, simply right-click the address bar at the top of the file browser window and select "Copy address as text."
-
Click the prominent "Process data" button. This process will take a short amount of time.
-
Once data processing is complete, proceed to automatic feature extraction.
- Choose the "rmvpe_gpu" pitch extraction algorithm.
- Click the "Feature extraction" button and wait for the process to finish.
Step 3: Train Your Voice Model
-
Before initiating the training process, configure a few final settings:
- Set the "Save frequency (save_every_epoch)" to 10.
- Determine the number of training epochs in the "Total training epochs (total_epoch)" field. Generally, if your audio material is of lower quality or has some background noise, use fewer epochs (around 20-50). For high-quality sources, you can opt for as many as 500. A suitable starting point for quality source vocal samples is around 150-200 epochs, but remember that more epochs will result in a longer training process.
-
The "Batch size per GPU" setting is vital. A higher value increases VRAM usage and speeds up training but monitor your GPU's memory. With 32GB of VRAM, try setting the batch size to approximately 24 and adjust based on your system's capabilities.
-
Set "Save only the latest '.ckpt' file to save disk space" to "yes" and "Cache all training sets to GPU memory" to "no."
-
Enable "Save a small final model to the 'weights' folder at each save point" by selecting "yes."
-
Now that you've configured the crucial settings, click the "Train feature index" button to train the feature index (you can also do this later if you prefer). Once it's complete, initiate the model training by clicking the large "Train model" button. Avoid using the "one-click training" feature, as it may be unstable in some cases.
-
Allow your GPU to handle the training process. Once it's finished (indicated in the terminal window), your model file should be available in the ~\RVC\RVC-[version-number]\weights directory[your-model-file].pth.
Note: The RVC WebUI saves model checkpoint files at set intervals to prevent overfitting and preserve training progress. Be sure to remove unnecessary checkpoints once you have your desired voice model to save space.
How Long Does It Take to Clone a Voice Using the RVC WebUI?
The duration of the voice cloning process depends on several factors, including the volume of training data, the number of training epochs, and the capabilities of your GPU.
For instance, on a system equipped with two RTX A6000, training a model with approximately 30 minutes of training voice data and 300 epochs typically takes around two hours in total.
It's worth noting that reducing the number of training epochs can expedite the training process, but there's a trade-off in quality as you might experience diminishing output quality when you decrease this value.
Moreover, increasing the batch size can also accelerate training, but setting it too high may lead to out-of-memory errors if your GPU lacks sufficient VRAM (GPU memory) capacity.
When it comes to model inference, on most contemporary graphics cards, the duration can vary from a few seconds for short voice lines to one or two minutes for longer audio files.
How to Convert One Voice into Another Using Model Inference
Now, let's delve into the model inference process, which essentially means changing voices or transforming one voice into another. To accomplish this, you'll need your trained model and a clear audio file containing the voice recording you want to convert into your trained voice.
The quality requirements for the voice audio file used for inference are quite similar to those for the training audio, with one key difference: the duration of the audio file is flexible.
The critical point to note here is that the audio file you use must be free of any background noise or instrumental elements.
When working with spoken content, you should have a clear and high-quality audio file. When dealing with songs, you'll need a clean acapella without any reverb or delay effects applied and preferably without any vocal harmonies.
The process of model inference is significantly faster than the training process, especially for shorter audio files, and on most modern hardware, it can be almost instantaneous. Here's how it works:
Step 1: Load a Voice Model
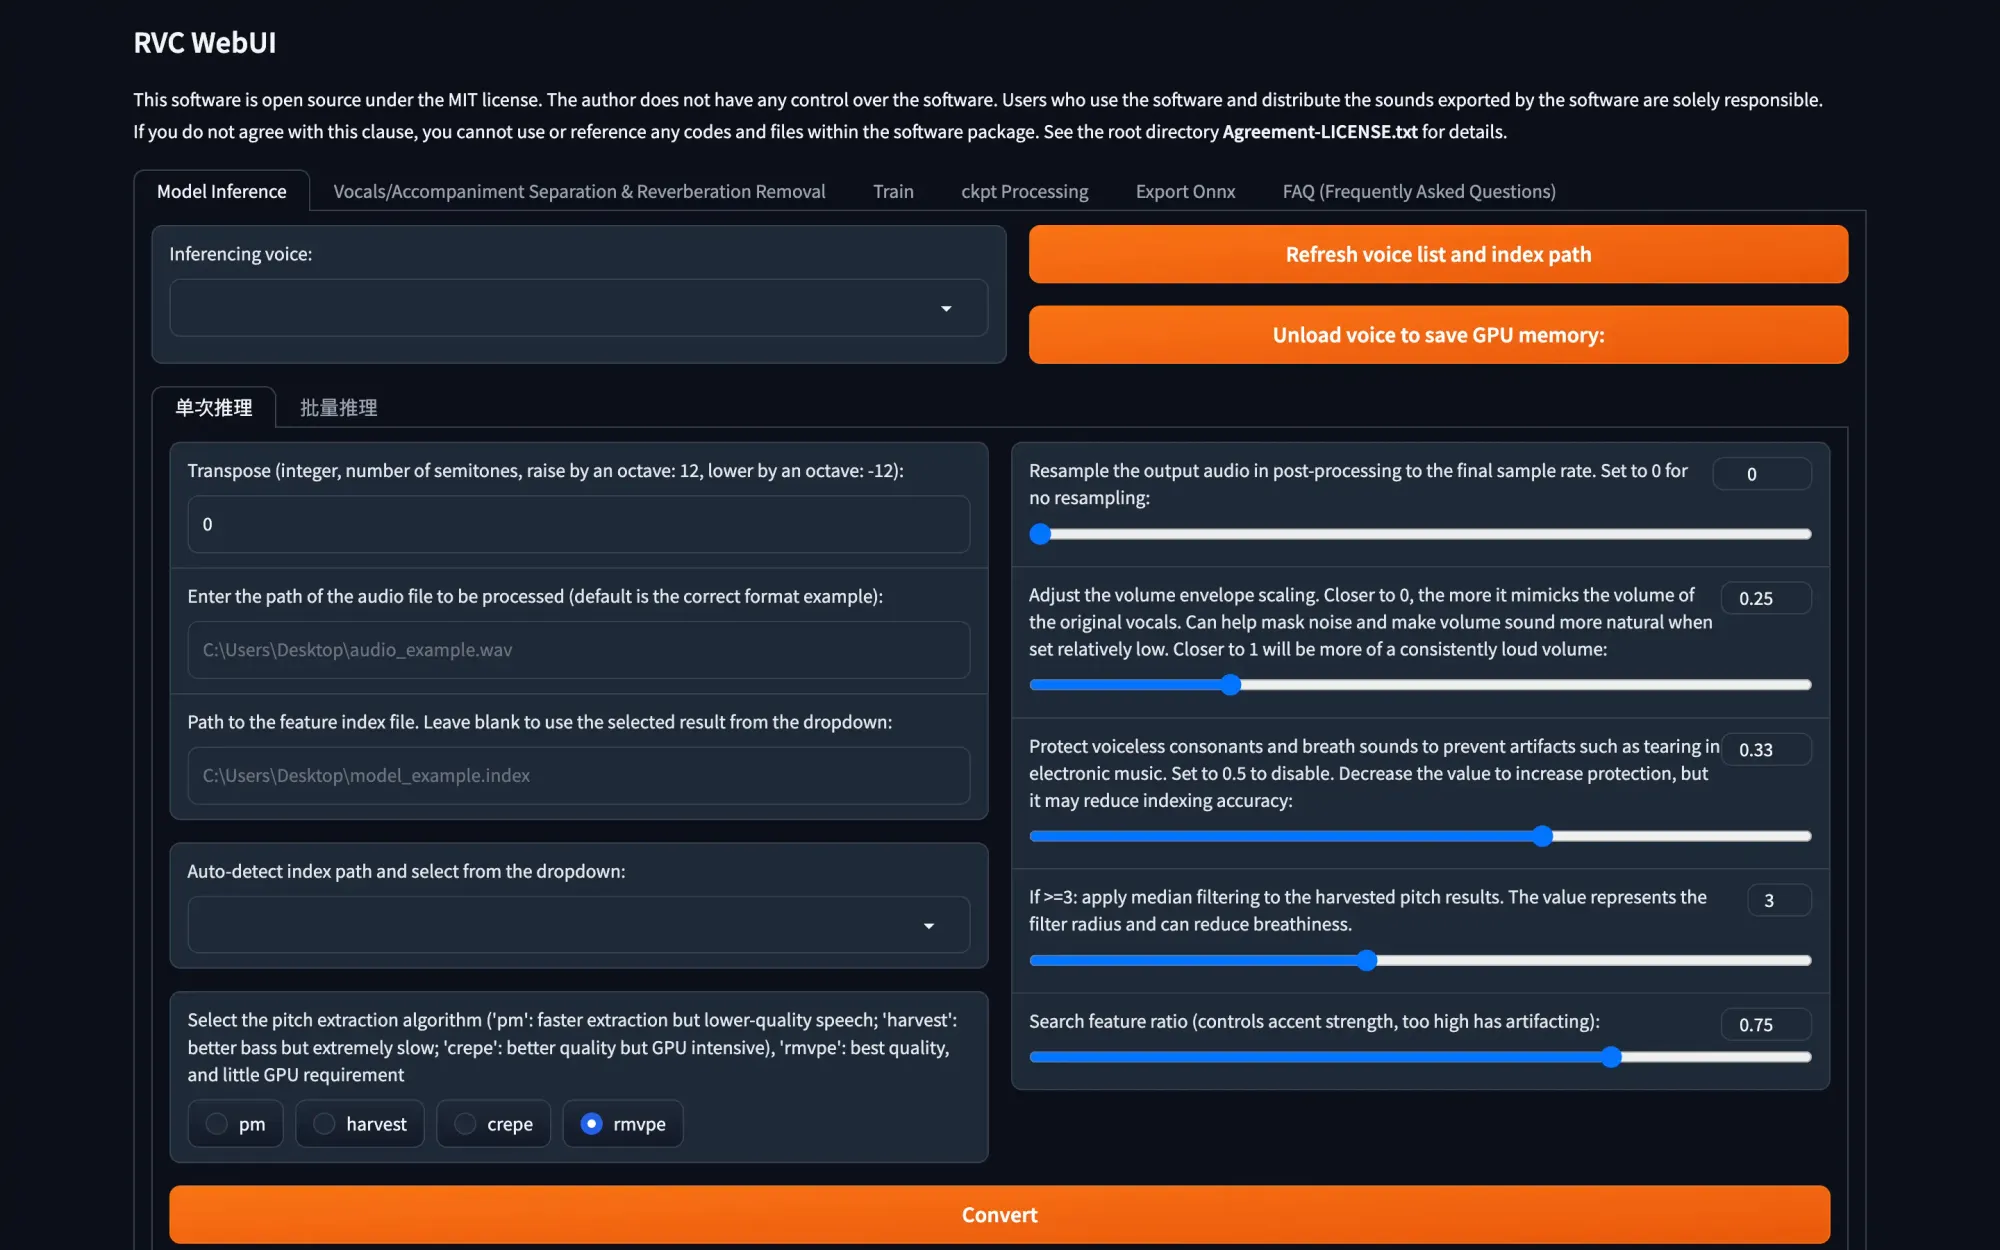
Begin by going to the "Model Inference" tab and click the "Refresh Voice List and Index Path" button. Your freshly trained model should now appear in the drop-down list on the left side of the window. Select it.
Next, input the file path to the audio file with the acapella vocals or the clean, noiseless voice recording you want to convert into your chosen voice. Ensure you specify the exact file you wish to convert at the end of the path – avoid entering the entire directory path.
Note: If you're attempting to change a naturally high-pitched voice to a lower pitch, you can adjust the "transpose" setting to shift the inferred voice up or down in terms of pitch.
Step 2: Configure Settings and Perform the Conversion
Select the "rmvpe" pitch extraction algorithm. In the "Path to the Feature Index File" field, choose or type the .index file that matches the name of the voice model you're using. If you don't have this file, you can proceed without it.
You can leave all the other settings as default for now, but feel free to experiment with them later if you want to fine-tune the inference process for better results.
Click on the "Convert" button, and wait until the inference process is complete, which typically takes around one to two minutes.
Congratulations! You can now save your audio file output by right-clicking on the small audio player that appears in the WebUI and saving the file to a directory of your choice.
What If I Don't Have an Acapella File?
If you lack a vocal-only file for the song you wish to create an AI voice cover for, you have a couple of options. You can either search for a studio acapella of the song online and use that, or create your own acapella using an AI audio isolation tool.
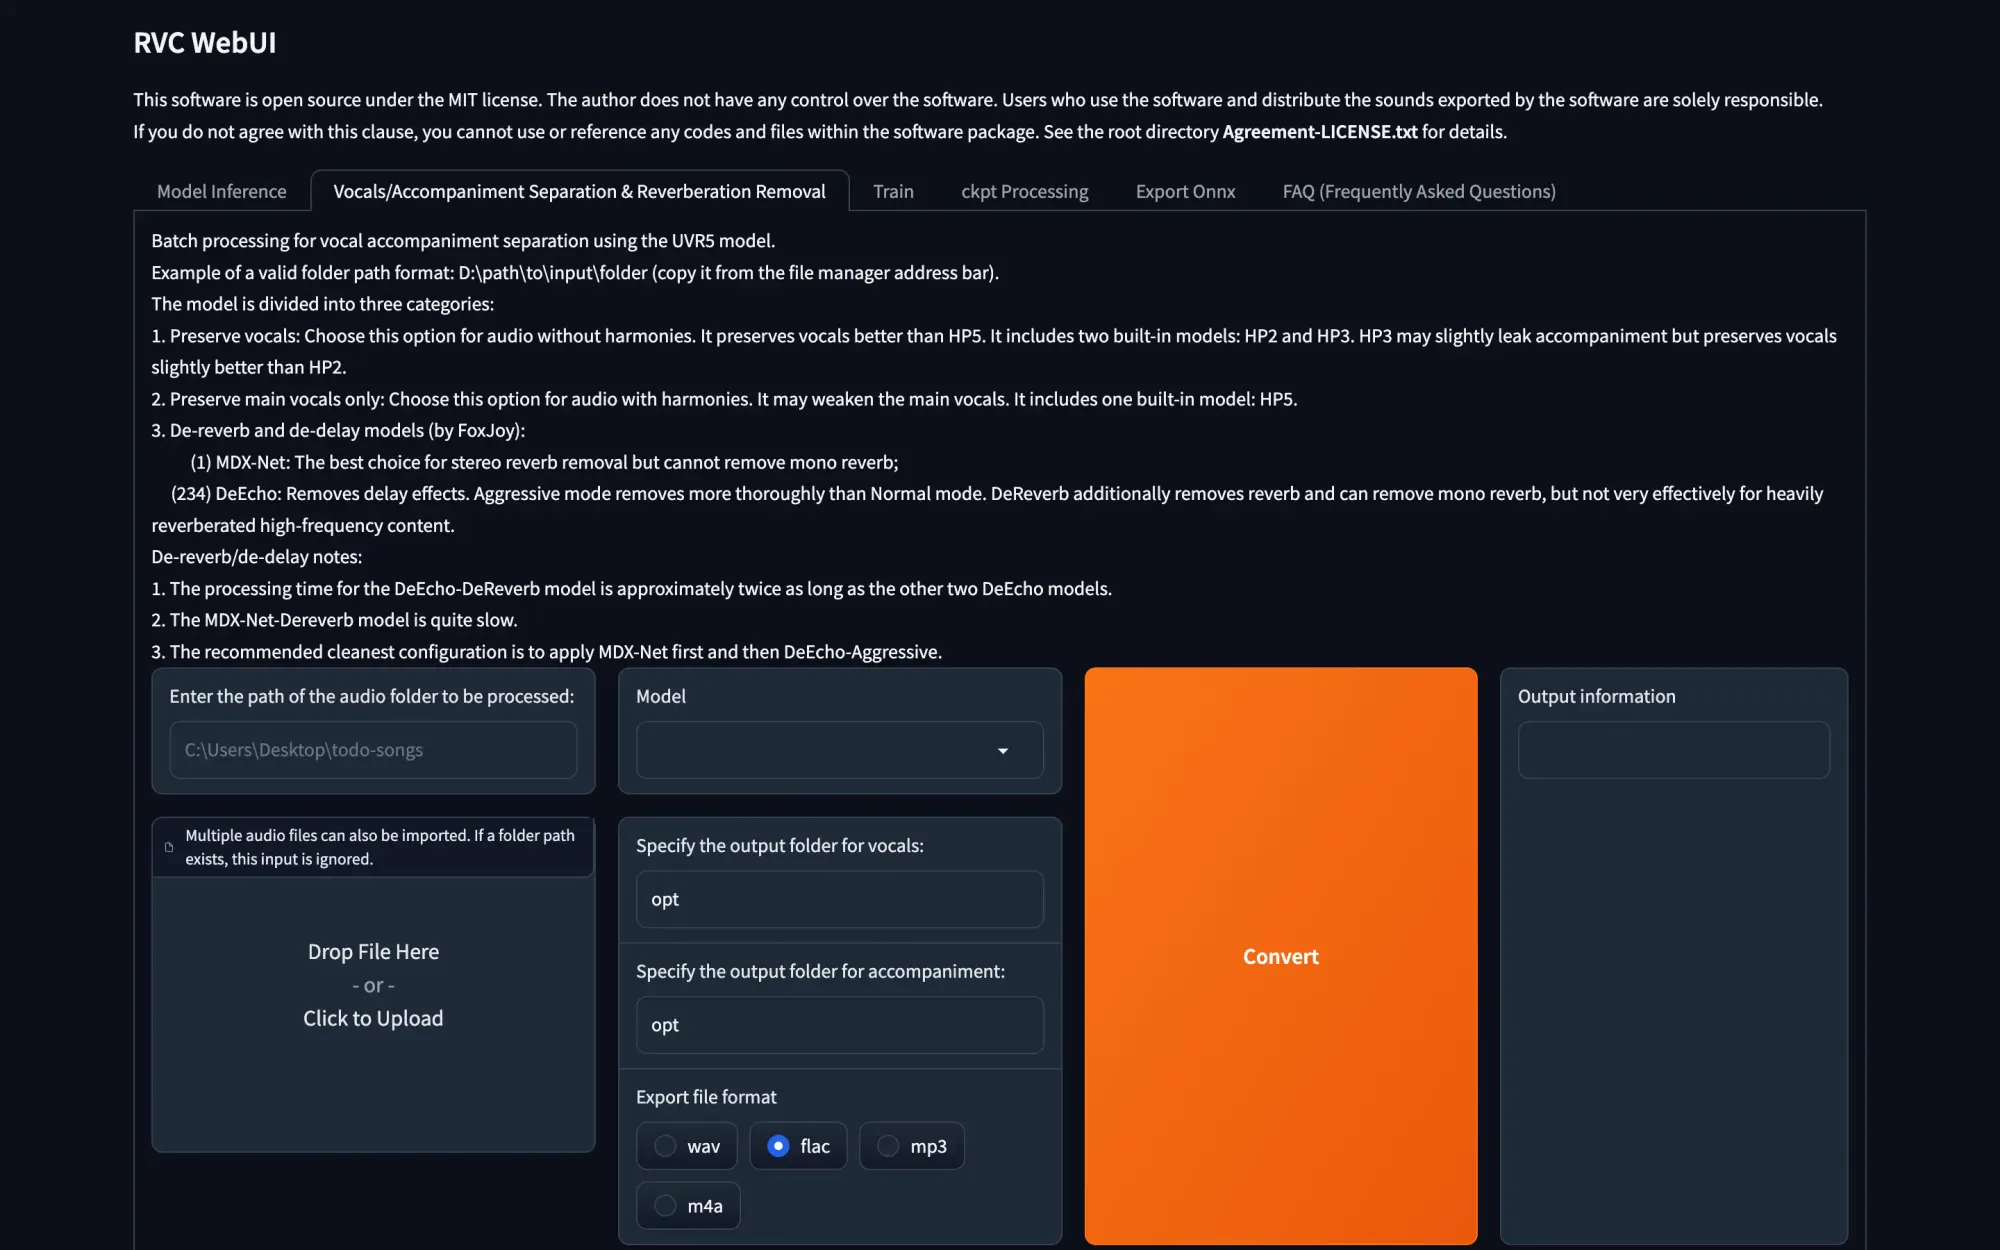
To create your own acapellas quickly and with minimal hassle, I recommend two methods. One option is to utilize the Ultimate Vocal Remover GUI, which is known for its speed and user-friendliness. Another choice is to employ the built-in vocal isolation utility available within the RVC WebUI under the "Vocals/Accompaniment Separation & Reverberation Removal" tab.
It's important to note that attempting to use music audio files containing instruments for either training or inference will yield nonsensical audio output, so please keep that in mind.
How to Add Downloaded Voice Models to RVC
Importing downloaded voice models into RVC is a straightforward process. When you obtain a custom voice model, such as those available in the voice model list created by kalomaze (please note that the spreadsheet might experience slowdowns, as it is updated in real-time), you will receive two essential files: the model weights and the feature index file.
It's important to emphasize that you can only use models that are compatible with RVC or were trained using RVC to clone voices, and this should be done through the "Model inference" tab.
Here's a step-by-step guide to importing your downloaded voice model and utilizing it in RVC:
- Place the model weights file (typically with a .pth extension) into the 'weights' folder.
- Put the feature index file (typically with a .index extension) into a folder with the exact same name as the .pth file.
That's all there is to it.
Once you've completed these steps, you'll be able to use your imported voices within the RVC WebUI, just as you would with your own trained voices. Enjoy the enhanced functionality!
Congratulations, You're Finished!
By following these steps, you've successfully crafted your inaugural cloned voice model and used it to create your first AI song cover. However, it's essential to recognize that voice cloning offers much more depth and complexity than what's covered here.
Please be aware that this guide is a fundamental, no-frills introduction. It does not delve into further aspects such as additional training and fine-tuning, offering only initial settings for a swift start.
If you're eager to delve deeper into the world of RVC (Realistic Voice Cloning) and expand your knowledge about voice cloning in general, I strongly recommend exploring more informative resources on the subject.
A valuable next step beyond this tutorial is the RVC v2 AI Cover Guide authored by kalomaze. This guide employs the slightly more efficient Mangio-RVC-Fork, which can lead to even more impressive training and inference outcomes.
I sincerely hope my guide has proven valuable. If you have any inquiries, please don't hesitate to reach out to me in the comments section below.
Demo
- Can't Take My Eyes Off You
- Rap God
- Stuck With U
Copyright statement: Unless otherwise stated, all articles on this blog adopt the CC BY-NC-SA 4.0 license agreement. For non-commercial reprints and citations, please indicate the author: Henry, and original article URL. For commercial reprints, please contact the author for authorization.