V2Ray Tutorial: One-click installation nodes, software download and configuration


[Deprecated] Please refer to the latest article:
 Henry
Henry
V2Ray is another software that can be used to replace VPN after Shadowsocks. Because the GFW’s blocking of VPNs is getting stronger, people have started to choose other softwares over the VPN, such as Shadowsocks, WireGuard, and so on. Many people think that V2Ray is more powerful than Shadowsocks’s ability to roll over the wall. This article is a V2Ray tutorial, which will introduce the construction of a V2Ray server (V2Ray node) (using a one-click installation script), V2Ray node optimization, downloading and setting of V2Ray client software, etc.
Part I: Introduction to V2Ray
If you visit the official website of V2Ray, you will find that there are many contents, the language specialty is complicated, and if you are not pro, you will be confused. Let’s make a V2Ray introduction in the simplest and most understandable language.
(1.1) WHAT IS V2RAY?
Simply put, V2Ray is a proxy software similar to Shadowsocks, which can be used to roll over the wall.
(1.2) WHAT IS THE DIFFERENCE BETWEEN V2RAY AND SHADOWSOCKS?
Because the developer was invited to “drink tea”, the development of Shadowsocks (including ShadowsocksR) has basically stopped. V2Ray is a more complex system developed on the basis of Shadowsocks. It can be simply understood that V2Ray is an upgraded version of Shadowsocks.
Like Shadowsocks, there is no commercial company behind V2Ray to support it. It is completely developed by volunteers for free and open source for everyone to use.
Compared with Shadowsocks, V2Ray provides a more complete protocol, corrects some of the shortcomings of Shadowsocks. It is more difficult to be detected by GFW, and provides more powerful performance. But currently V2Ray has not reached the popularity of Shadowsocks, so it is relatively weak in software support and other aspects.
At present, V2Ray is mainly popular among technical netizens (such as programmers). This is because the construction of V2Ray nodes is not simple and requires certain technologies.
(1.3) THE COMPOSITION OF THE V2RAY SYSTEM:
The V2Ray system is composed of two parts:
(1.3.1) V2Ray node (Server):
(1.3.1.1) Built on a VPS computer server located outside the wall (outside mainland China).
(1.3.1.2) A V2Ray node (server) can be used by multiple users and multiple devices at the same time.
(1.3.1.3) You can build V2Ray nodes yourself (see the V2Ray one-click installation tutorial below for details).
(1.3.2) V2Ray client software (Client):
(1.3.2.1)The software that is directly used to use V2Ray over the wall can be used on different devices: computers, mobile phones, etc.
(1.3.2.2)V2Ray client software can be downloaded for free.
Part 2: Construction and optimization of V2Ray nodes
(2.1) PURCHASE AN OUT-OF-WALL SERVER (VPS):
Common overseas VPS suppliers include DigitalOcean, Vultr, Bandwagon, Amazon AWS, and so on.
(2.2) CREATE A VIRTUAL HOST VPS
After the virtual host is created, you will see the IP address of the host. Please remember this address for the next login and V2Ray connection.
(2.3) LOG IN TO THE VIRTUAL HOST USING SSH:
Now you need to SSH to the virtual host VPS. Mac computers can use the built-in Terminal, Windows computers can use Putty or Windows 10 latest available Ubuntu. How to connect is not written here, the command line is basically “ssh root @ [IP Address]”.
After connecting the virtual host, run the following command to update the host and download related software:
apt-get update -y && apt-get install curl -y(2.4) ONE-CLICK INSTALLATION OF V2RAY:
We will use the one-click installation script mentioned on the V2Ray official website to install the V2Ray node (server) with one click.
Connect to the virtual host as Root and run the following command:
bash <(curl -L -s https://install.direct/go.sh)This V2Ray one-click installation script can not only install V2Ray, but also configure an auto-run script to automatically run V2Ray after each time system restarts.
(2.5) MODIFY V2RAY CONFIGURATION:
The V2Ray one-click installation script we just used will automatically generate a V2Ray configuration file (/etc/v2ray/config.json). If you want to modify the configuration, you need to edit this configuration file to complete it. Can be edited with this command:
nano /etc/v2ray/config.jsonPlease note that there are several very important contents in the V2Ray configuration file that you need to write down for later use to connect V2Ray nodes with software V2Ray:
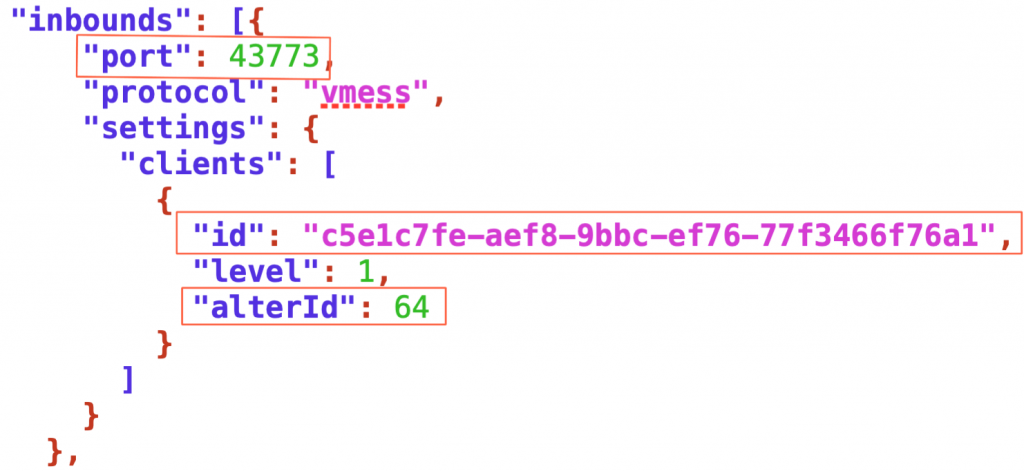
Please note: Several parameters marked in the figure can be modified by yourself, but the user ID must meet a specific format (there are special tools on the Internet to generate new user IDs). However, you can modify the port (for example, 443), or you can modify the extra ID (alterID) to other numbers (the larger the more difficult to identify, but the greater the consumption).
After the server configuration is modified, you need to restart V2Ray by running the following command line:
service v2ray restart(2.6) V2RAY SERVER SPEED OPTIMIZATION (OPTIONAL, BUT RECOMMENDED):
Here are some additional tips and changes to the server configuration to optimize V2Ray nodes and make the wall faster.
Install Google TCP BBR congestion control algorithm to speed up the server:
Here we use the one-click installation script of Teddysun. Still SSH into the host as Root and run the following command line:
wget --no-check-certificate https://github.com/teddysun/across/raw/master/bbr.sh && chmod +x bbr.sh && ./bbr.shIf you see the prompt “Press any key …”, press Enter to start the installation.
If an option appears during the installation process, press Enter to select the default option. Finally, you may need to restart the server host.
Then restart V2Ray:
service v2ray restartCongratulations! V2Ray node (server-side) installation, setting, optimization and speed-up have been completed. Here’s how to use the V2Ray client.
Part III: Download and Configuration of V2Ray Client
V2Ray client refers to the software or APP installed on the user’s computer, mobile phone, and other devices. It is used to connect to the V2Ray server to achieve the purpose of rolling over the wall.
(3.1) V2RAY CLIENT SOFTWARE DOWNLOAD:
Here are the download links for the V2Ray client:
(3.1.1) Windows: Download V2RayN (select the latest release, download v2rayN-Core.zip, run v2rayN.exe after decompression)
(3.1.2) Mac: Download V2RayX (Download the latest release zip file, and then install it after decompression)
(3.1.3) Android phone / tablet: Download V2RayNG (you can download the latest app-universal-release.apk installation file)
(3.1.4) Apple phone / tablet: use overseas account to search “Shadowrocket” (paid app), “ShadowRay”, “Kitsunebi” or “Pepi”
(3.2) BASIC CONFIGURATION OF V2RAY CLIENT:
Because V2Ray software and App have different interfaces on different platforms, we will not introduce them one by one here. The most critical parameters when setting include:
(3.2.1) Server (server address): is the IP address of the VPS virtual host we installed earlier
(3.2.2) Port: can be found in the server configuration file config.json
(3.2.3) ID (user ID): can be found in the server configuration file config.json
(3.2.4) AlterID (extra ID): can be found in the server configuration file config.json
(3.2.5) Security (encryption method): You can set it yourself. It has nothing to do with server configuration.
(3.3) V2RAY PROXY MODE SETTINGS:
V2Ray has two main proxy modes:
(3.3.1) Global mode: All traffic of the computer goes through V2Ray proxy. If you usually visit foreign websites most of the time, you can choose this mode.
(3.3.2) PAC mode: After turning on, the software will automatically download a GFW List’s PAC list file. The rule list in the PAC file controls which traffic goes through V2Ray (such as blocked sites) and which does not (such as domestic URLs).
OK, here our V2Ray tutorial basically ends here. I hope everyone can successfully install and use V2Ray smoothly.
Copyright statement: Unless otherwise stated, all articles on this blog adopt the CC BY-NC-SA 4.0 license agreement. For non-commercial reprints and citations, please indicate the author: Henry, and original article URL. For commercial reprints, please contact the author for authorization.